Sorry, your browser cannot access this site
This page requires browser support (enable) JavaScript
Learn more >

介绍

Java是一种广泛使用的计算机编程语言,拥有跨平台面向对象泛型编程的特性,广泛应用于企业级Web应用开发和移动应用开发。

Hello World

1
2
3
4
5
public class HelloWorld {
public static void main(String[] args) {
System.out.println("Hello, World!");
}
}
  • public class HelloWorld:定义了一个类,类名必须和文件名一致(区分大小写),所以这份文件必须取名为HelloWorld.java
  • public static void main(String[] args):这是 Java 程序的入口方法,运行时会从这里开始执行。

    • String[] args:用来接收命令行参数,比如运行时 java HelloWorld a b cargs 就是 ["a","b","c"]
    • String args[]String[] args 都可以执行,但推荐使用 String[] args,这样可以避免歧义和误读。
  • System.out.println("Hello, World!");:向控制台输出 "Hello, World!"

注意,一份java文件里最多只能有一个public class

面向对象编程

面向对象意味着程序通过“对象”来组织和运行。而在 Java 中,类(class)是对象的模板,描述了对象的属性和行为。

类中可以包含:

  • 字段(field):用来表示对象的数据。
  • 方法(method):用来定义对象能做的事。

例子:

1
2
3
4
5
6
7
8
9
10
11
12
13
14
15
16
17
18
19
20
class Person {
// 字段
String name;
int age;

// 方法
void sayHello() {
System.out.println("Hello, my name is " + name);
}
}

// 使用类
public class test {
public static void main(String[] args) {
Person p = new Person(); // 创建对象
p.name = "Alice";
p.age = 20;
p.sayHello(); // 调用方法
}
}

而对象有着三个核心特征:

  1. 身份:

    属性可以发生变化,但身份不会。比如说名字,身份证号等。

  2. 状态:

    当前所有属性的集合。比如说身高体重等。

  3. 行为:

    进行会修改当前状态的操作。如吃饭,喝水等。

构造函数

  • 是一种特殊方法,与 new 联合使用。
  • 名字和类名相同,没有返回类型。
  • 如果一个类里不写任何构造函数,Java 自动给你生成一个无参的“默认构造函数”。

例子:

1
2
3
4
5
6
7
8
class Rational {
private int numerator, denominator;

Rational(int z, int n) { // 构造函数
numerator = z;
denominator = n;
}
}

调用:

1
Rational a = new Rational(3, 4);

引用/reference

1
2
3
Rational a = new Rational(3, 4);

Rational b = a; // b 和 a 指向同一个对象
  • b = a; 并不是复制一份新对象,只是复制了一份引用地址,即指向同一个对象。

  • 所以通过 b 改对象,其实就是改 a 指向的那个对象。

对象作为属性

我们同样也可以将对象设置成属性。(简单来讲就是套娃,对象套对象。)

1
2
3
4
5
6
7
8
9
10
11
12
13
class Point {
double x, y;
}

class Line {
private Point p1;
private Point p2;

Line(Point p, Point q) { // 构造函数
p1 = p;
p2 = q;
}
}

类属性

private

private 修饰的成员是“仅在本类内部可见”的:类外代码不能直接访问,只能通过本类提供的方法间接使用。

比如说

1
2
3
4
5
6
7
8
class Rational {
private int numerator, denominator;

Rational(int z, int n) { // 构造函数
numerator = z;
denominator = n;
}
}
1
Rational a = new Rational(3, 4);

在其他类里,不能直接通过a.numerator来访问a的分子。

尽量将所有的属性都设置成private。可以更好地保护以及管控对象内的属性。

public

private 修饰的成员是所有类可见。

比如说:

1
2
3
4
5
6
7
8
class Rational {
public int numerator, denominator;

Rational(int z, int n) { // 构造函数
numerator = z;
denominator = n;
}
}

那么所有类都可以直接调用

1
2
3
Rational a = new Rational();

a.numerator = 3;

static

static修饰的成员是“类级别”的:所有对象共享一份。

例子:统计创建了多少个 Count 对象:

1
2
3
4
5
6
7
8
9
class Count {
private static int count = 0; // 类属性
private int info; // 对象属性

public Count() {
info = count;
count = count + 1;
}
}
  • count 是整个类共享的计数器。
  • 每次 new Count(),构造函数就把当前 count 值写到 info,然后 count++
  • 结果:每个对象的 info 都是一个唯一的编号 0,1,2,…

相同/相等

  • == 比较的是引用是否相同(是不是同一个对象)。
  • 想比较两个对象内容是否相同(相等,identical),需要写自己的 equals 方法,比如:
1
2
3
4
5
6
public class Rational {
int zaehler, nenner;
public boolean equals(Rational r) {
return (zaehler * r.nenner == r.zaehler * nenner);
}
}

命名

Sun(Sun Microsystems, Inc.,当时发明Java语言和平台的公司)很早就给 Java 出了一份官方《Code Conventions for the Java Programming Language》,里边明确推荐:

  • 类名UpperCamelCaseArrayList, StringBuilder
  • 方法 / 变量lowerCamelCaseloadBefore, userName
  • 常量(static final)ALL_CAPS_SNAKE_CASEMAX_VALUE, DEFAULT_TIMEOUT
  • 包名:全小写点分 → java.util, org.example.app

Java 标准库全部遵守这个规范:
ArrayList, HashMap, getClass(), toString(), System.out.println(), Math.max()…… 所有 API 都是驼峰风格。

基本数据类型

Java语言提供了八种基本类型。六种数字类型(四个整数型,两个浮点型),一种字符类型,还有一种布尔型。

byte:

  • byte 数据类型是8位、有符号的,以二进制补码表示的整数;
  • 最小值是 -2^7;
  • 最大值是 2^7-1;
  • 默认值是 0
  • byte 类型用在大型数组中节约空间,主要代替整数,因为 byte 变量占用的空间只有 int 类型的四分之一;
  • 例子:byte a = 100,byte b = -50。

short:

  • short 数据类型是16 位、有符号的以二进制补码表示的整数
  • 最小值是 -2^15;
  • 最大值是 2^15 - 1;
  • Short 数据类型也可以像 byte 那样节省空间。一个short变量是int型变量所占空间的二分之一;
  • 默认值是 0
  • 例子:short s = 1000,short r = -20000。

int:

  • int 数据类型是32位、有符号的以二进制补码表示的整数;
  • 最小值是 -2^31;
  • 最大值是 2^31 - 1;
  • 一般地整型变量默认为 int 类型;
  • 默认值是 0
  • 例子:int a = 100000, int b = -200000。

long:

  • long 数据类型是64 位、有符号的以二进制补码表示的整数;
  • 最小值是 -2^63;
  • 最大值是 2^63 -1;
  • 这种类型主要使用在需要比较大整数的系统上;
  • 默认值是 0L
  • 例子: long a = 100000L,long b = -200000L。
    “L”理论上不分大小写,但是若写成”l”容易与数字”1”混淆,不容易分辩。所以最好大写。

float:

  • float 数据类型是单精度、32位、符合IEEE 754标准的浮点数;
  • float 在储存大型浮点数组的时候可节省内存空间;
  • 默认值是 0.0f
  • 浮点数不能用来表示精确的值,如货币;
  • 例子:float f1 = 234.5f。

double:

  • double 数据类型是双精度、64 位、符合 IEEE 754 标准的浮点数;

  • 浮点数的默认类型为 double 类型;

  • double类型同样不能表示精确的值,如货币;

  • 默认值是 0.0d

  • 例子:

    1
    2
    3
    4
    5
    double   d1  = 7D ;
    double d2 = 7.;
    double d3 = 8.0;
    double d4 = 8.D;
    double d5 = 12.9867;

    7 是一个 int 字面量,而 7D,7. 和 8.0 是 double 字面量。

boolean:

  • boolean数据类型表示一位的信息;
  • 只有两个取值:true 和 false;
  • 这种类型只作为一种标志来记录 true/false 情况;
  • 默认值:

    • 作为字段/数组元素的话,默认值是false
    • 但如果是局部变量,则没有默认值,需要自己初始化。
  • 例子:boolean one = true。

char:

  • char 类型是一个单一的 16 位 Unicode 字符;
  • 最小值是\u0000(十进制等效值为 0);
  • 最大值是\uffff(即为 65535);
  • char 数据类型可以储存任何字符;
  • 例子:char letter = ‘A’;。

除此以外还有一个比较特殊的写法:var,会让编译器从右侧初始化表达式推断变量类型。比如说var n = 7; n 的静态类型是 int。但是无法用var初始化一个变量,即var n;是违规的。

byte、int、long、和short都可以用十进制、16进制以及8进制的方式来表示。

前缀 0 表示 8 进制,而前缀 0x 代表 16 进制, 例如:

1
2
3
int decimal = 100;
int octal = 0144;
int hexa = 0x64;

String(字符串)

String 不是基本类型,是一个,但使用方式比较特殊:

  • 字面量:"Hello World!"
  • 拼接:"Hello " + "World"

还有一个非常重要的点:

任意类型在和String+ 时,会自动转成 String

例:

1
2
3
double x = -0.55e13;
System.out.println("Eine Gleitkomma-Zahl: " + x);
// Eine Gleitkomma-Zahl: -5.5E12

但是这是有先后顺序的:在String之前的+运算会被当成普通的加法运算,而String之后的+会被当成字符串拼接,比如说:

1
2
System.out.println(1 + 2 + "h" + 1 + 2);
// 会输出3h12

即先计算了1+2=3,然后再把”3”,”h”,”1”,”2”当成了字符串拼接了起来。

转义字符

Java语言支持一些特殊的转义字符序列。

符号 字符含义
\n 换行 (0x0a)
\r 回车 (0x0d)
\f 换页符(0x0c)
\b 退格 (0x08)
\0 空字符 (0x0)
\s 空格 (0x20)
\t 制表符
\" 双引号
\' 单引号
\\ 反斜杠
\ddd 八进制字符 (ddd)
\uxxxx 16进制Unicode字符 (xxxx)

Operation(运算符)

算术运算符

  • + - * / %

Java 在二元数值运算里会做二进制数值提升(binary numeric promotion):

  1. 先把比 int 小的整型(byte/short/char)都提升到 int
  2. 再根据两个操作数中“更大的类型”统一到 long / float / double
  3. 结果类型就是提升后的那个类型。

例子:

1
2
3
int n = 2;
long l = 3L;
var x = n + l;
  • n 提升为 long,结果是 longx 推断为 long,值 5L
1
2
3
int n = 2;
double d = 7.0;
var x = n + d;
  • n 提升为 double,结果是 doublex 推断为 double,值 9.0
1
2
3
short s1 = 1;
short s2 = 2;
short s3 = s1 + s2;
  • 无法成功编译。s1 + s2 先都提升为 int,结果是 int,不能隐式放回 short
    正确写法:short s3 = (short)(s1 + s2); 或者 var s3 = s1 + s2; // s3 是 int

除法 /

除法会分成整除浮点除:两个 int/long 做除法得到整除(向零截断),只要有 double/float 参与就是浮点除。

1
2
3
4
5
6
7
double d1 = 7 / 3;      // 7/3 先做整除得 2,再拓宽为 2.0
double d2 = 7.0 / 3; // 2.3333333333333335
double d3 = 7 / 3.0; // 2.3333333333333335
double d4 = 7.0 / 3.0; // 2.3333333333333335

double d5 = 3 / 0.5; // 3 提升为 double => 3.0 / 0.5 = 6.0
double d6 = 3 / (1/2); // (1/2) 是整除得 0,表达式变成 3/0(int)=> 运行时抛出 ArithmeticException: / by zero

但假设右边的变量都是int,但我们希望左边的结果为double / float时,我们便需要在左边加上(double )/(float)来确保数据类型:

1
2
3
4
int x = 7, y = 3;
double q0 = x/y; // 直接整除得到2 => 2.0
double q1 = (double) (x / y); // 先整除得到2,再转 double => 2.0
double q2 = (double) x / y; // 先把 x 变 double => 7.0/3 => 2.3333333333333335

取余(%

Java 的余数符号与左操作数(被除数)相同,并满足:a == (a/b)*b + (a%b)(这里的 / 仍是向零截断)。

1
2
3
4
5
6
7
8
9
10
11
int v1 = 11 % 4;     // 3
int v2 = 0 % 4; // 0
int v3 = 4 % 0; // 运行时 ArithmeticException: / by zero

int v4 = -11 % 4; // -3 (-11/4 == -2,余数 r = -11 - (-2)*4 = -3)
int v5 = 11 % -4; // 3
int v6 = -11 % -4; // -3

double v7 = 3.5 % 2; // 1.5
double v8 = 3.5 % 2.5; // 1.0
double v9 = (22/7) % (19/7); // (22/7)==3,(19/7)==2,3%2==1 => 1.0

自增/自减(++/--

前缀:先改值后取值;后缀:先取值后改值。

1
2
3
4
5
6
7
8
9
10
int n = 5;
--n; // n = 4
int k = n++ - --n; // 左: n++ 返回 4,n=>5;右: --n 先减到 4 返回 4;k=4-4=0;此后 n=4

int l = ++n + n--; // ++n: 5;n--: 先用 5 再变 4;l=5+5=10;n=4
n = n--; // 右边返回 4,再把 n 减到 3,然后赋回左边 n=4(“自减的结果值”被赋回)

System.out.println("k = " + k); // 0
System.out.println("l = " + l); // 10
System.out.println("n = " + n); // 4

但是注意,有一个容易出错的点是:

1
2
3
4
int a = 0;
a = a++;
System.out.println(a);
// 会输出0。

因为a = a++;相当于给a重新又赋值成了0,没有++的机会。

1
2
3
4
5
6
7
8
9
double d = 3.14;
char c = 'L';
int n1 = (int) d--; // 先取 3.14 再 d=2.14;(int)3.14==3
int n2 = ++c; // 'L'->'M'(77),表达式值是 'M',赋给 int 得 77

System.out.println("d = " + d); // 2.14
System.out.println("c = " + c); // M
System.out.println("n1 = " + n1); // 3
System.out.println("n2 = " + n2); // 77

比较运算符

基本值比较

1
2
3
4
5
boolean b1 = 4 == 4.0;          // true(4 提升为 4.0)
boolean b2 = 7L == (short) 5; // false(7 != 5)
boolean b3 = true == 1; // **不通过编译**(boolean 不能与整型用 == 比较)
boolean b4 = 'd' == 100; // true('d' 的码位是 100)
boolean b5 = false == b4; // false == true -> false

引用比较(对象)

1
2
3
4
5
6
7
8
9
10
11
12
13
14
15
16
17
class A {
private int n;
public A(int n) { this.n = n; }
public int getN() { return n; }
public void setN(int n) { this.n = n; }
}

A a1 = new A(2);
A a2 = new A(3); a2.setN(2);
A a3 = new A(3 - 1); // 2
A a4 = new A(2);
A a5 = a1;

System.out.println(a1 == a2); // false(不同对象)
System.out.println(a1 == a3); // false
System.out.println(a1 == a4); // false
System.out.println(a1 == a5); // true(同一引用)
  • == 比较的是引用是否同一对象,不是内容。若想按内容比较,应覆写 equals

字符串相等性

1
2
3
4
5
6
7
8
9
10
11
12
13
14
15
String s1 = "abc";
String s2 = "abc";
String s3 = "a" + "b" + "c"; // 编译期常量折叠,指向同一常量池对象
String s4 = new String("abc"); // 显式新建对象
String s5 = s1 + ""; // 运行期拼接,通常新对象

System.out.println("s1 == s2: " + (s1 == s2)); // true
System.out.println("s1 == s3: " + (s1 == s3)); // true
System.out.println("s1 == s4: " + (s1 == s4)); // false
System.out.println("s1 == s5: " + (s1 == s5)); // false(几乎总是)

System.out.println("s1.equals(s2): " + s1.equals(s2)); // true
System.out.println("s1.equals(s3): " + s1.equals(s3)); // true
System.out.println("s1.equals(s4): " + s1.equals(s4)); // true
System.out.println("s1.equals(s5): " + s1.equals(s5)); // true
  • 结论:比较字符串内容用 equals,不要用 ==

浮点比较陷阱

1
2
double d = Math.sqrt(2) * Math.sqrt(2);
System.out.println(d == 2.0); // 往往是 false(浮点误差)
  • 解决:用误差容忍(epsilon):

    1
    boolean close = Math.abs(d - 2.0) < 1e-10;

逻辑运算符

真值表

  • |(逻辑或,不短路):
    • false|false => false
    • false|true => true
    • true |false => true
    • true |true => true
  • ^(逻辑异或,不短路):两边不同为 true
    • false^false => false
    • false^true => true
    • true ^false => true
    • true ^true => false

(补充:&|布尔版(不短路)与按位版&&||短路逻辑。)

短路与副作用

1
2
3
4
5
6
7
8
9
10
11
int n1 = 7;
boolean b1 = n1 < 4 & ++n1 % 2 == 0; // & 不短路:右侧必评估,n1 变 8
// 左假右真 => b1=false,n1==8

int n2 = 7;
boolean b2 = n2 < 4 && ++n2 % 2 == 0; // && 短路:左边已为假,右侧不评估,n2 仍 7

System.out.println("n1 == " + n1); // 8
System.out.println("b1 == " + b1); // false
System.out.println("n2 == " + n2); // 7
System.out.println("b2 == " + b2); // false

赋值运算符与结合性

所有赋值运算符(=、+=、-=、...)都是右结合:从右往左算。+= 等复合赋值在需要时会隐式强制类型转换(先算出右值,再转换为左侧变量类型)。

1
2
3
4
5
6
7
int n1 = 1, n2 = 2, n3 = 3;
n1 = n2 = n3 = 4;
// 等价于:n3=4; n2=n3; n1=n2;

// n1 == 4
// n2 == 4
// n3 == 4
1
2
3
4
5
6
7
int n1 = 1, n2 = 2, n3 = 3;
n1 += n2 += n3 += 4;
// 步骤:n3=3+4=7; n2=2+7=9; n1=1+9=10;

// n1 == 10
// n2 == 9
// n3 == 7
1
2
int n1 = 1, n2 = 2, n3 = 3;
n1 += n2 + n3 = 4; // **不通过编译**
  • 原因:n2 + n3 不是变量,不能作为赋值左值。
1
2
3
4
5
6
7
int n1 = 1, n2 = 2, n3 = 3;
n1 += n2 = n3 + 4; // **可以编译**(赋值表达式有值)
// 右结合:n2 = 3+4 => 7;然后 n1 += 7 => 8;n3 保持 3。

// n1 == 8
// n2 == 7
// n3 == 3

修饰符

Java语言提供了很多修饰符,主要分为以下两类:

  • 访问修饰符
  • 非访问修饰符

修饰符用来定义类、方法或者变量,通常放在语句的最前端。我们通过下面的例子来说明:

1
2
3
4
5
6
7
8
9
public class ClassName {
// ...
}
private boolean myFlag;
static final double weeks = 9.5;
protected static final int BOXWIDTH = 42;
public static void main(String[] arguments) {
// 方法体
}

访问控制修饰符

Java中,可以使用访问控制符来保护对类、变量、方法和构造方法的访问。Java 支持 4 种不同的访问权限。

  • default (即默认,什么也不写): 在同一包内可见,不使用任何修饰符。使用对象:类、接口、变量、方法。
  • private : 在同一类内可见。使用对象:变量、方法。 注意:不能修饰类(外部类)
  • public : 对所有类可见。使用对象:类、接口、变量、方法
  • protected : 对同一包内的类和所有子类可见。使用对象:变量、方法。 注意:不能修饰类(外部类)

访问控制:

修饰符 当前类 同一包内 子孙类(同一包) 子孙类(不同包) 其他包
public Y Y Y Y Y
protected Y Y Y Y/N N
default Y Y Y N N
private Y N N N N

注释

单行注释:

1
2
3
// 注释

/* 注释 */

多行注释:

多行注释以 /*开始,以*/结束:

1
2
3
4
/* 
多行
注释
*/

文档注释:
文档注释以 /** 开始,以 */ 结束

1
2
3
4
/**
* 这是一个文档注释示例
* 它通常包含有关类、方法或字段的详细信息
*/

测试

JUnit5是Java领域里标准单元测试框架。

import:

1
2
3
4
import org.junit.jupiter.api.Test;
import org.junit.jupiter.api.BeforeEach;
import org.junit.jupiter.api.AfterEach;
import static org.junit.jupiter.api.Assertions.*;

先来看一个简单的例子:

1
2
3
4
@Test
public void exampleTest() {
assertEquals(42, 42);
}

@Test是一个 注解(annotation),来自 JUnit(比如 org.junit.Test)。它告诉测试框架:“下面这个方法是一个测试用例,请在执行测试时自动运行它”。 只要点 IDE 里的 “Run Tests”,测试框架就会扫描所有带 @Test 的方法,然后一个个执行。

常用注解包括:

  • @Test: 标记一个方法为单元测试方法。
  • @BeforeEach: 前置设置。在每个测试方法运行之前执行一次,用于初始化数据或环境。
  • @AfterEach: 后置清理。在每个测试方法运行之后执行一次,用于清理资源。
  • @ParameterizedTest: 参数化测试。允许使用不同的输入数据多次运行同一个测试方法,减少重复代码。

assertEquals(42, 42);是一个断言 (Assertions),是测试的核心。它用来验证实际运行结果是否符合预期。

常用断言包括:

  1. 相等性与不等性断言 (Equality)
    • assertEquals(expected, actual): 断言期望值与实际值相等(比较内容/值)。
    • assertNotEquals(unexpected, actual): 断言实际值与给定的值不相等。
    • assertArrayEquals(expected, actual): 断言两个数组包含相同的元素序列且顺序一致。
  2. 真值断言 (Boolean Conditions)
    • assertTrue(condition): 断言给定的布尔条件为 (true)。
    • assertFalse(condition): 断言给定的布尔条件为 (false)。
  3. 空值断言 (Nullity)
    • assertNull(actual): 断言实际值为 (null)。
    • assertNotNull(actual): 断言实际值 非空
  4. 对象身份断言 (Identity / Same Reference)
    • assertSame(expected, actual): 断言期望对象和实际对象是同一个对象实例(即引用相等)。
    • assertNotSame(unexpected, actual): 断言两个对象不是同一个对象实例。
  5. 异常与行为断言 (Exceptions and Behavior)
    • assertThrows(Type, executable): 断言在执行可执行代码时,会抛出指定类型的异常。
    • assertDoesNotThrow(executable): 断言在执行代码时,不会抛出任何异常。
    • assertTimeout(duration, executable): 断言代码块在指定的时间内执行完毕(非抢占式)。
    • assertTimeoutPreemptively(duration, executable): 断言代码块在指定时间后立即被中止(抢占式)。
  6. 组合与失败断言 (Grouping and Failure)
    • assertAll(executables...): 组合断言。即使前面的断言失败,也会继续执行所有断言,然后统一报告所有失败。
    • fail(message): 强制使当前测试方法失败,并带有一个可选的消息。

除此以外,Java 测试方法通常有几个特点:

  1. 必须是 public
    这样测试框架可以通过反射来调用这个方法。
  2. 返回类型是 void
    测试的“结果”不是通过返回值表示的,而是:
    • 不抛异常 → 视为测试通过
    • 抛出断言异常(AssertionError)或其他异常 → 视为测试失败

控制结构

控制结构一般分为3种:

  1. 顺序结构
  2. 选择结构
  3. 迭代结构

任何可计算的函数都可以通过顺序、选择和迭代这三种结构计算出来(图灵完备性) 。

选择结构

if / else

1
2
3
4
5
6
7
8
int score = 85;
if (score >= 90) {
System.out.println("A");
} else if (score >= 80) {
System.out.println("B");
} else {
System.out.println("C");
}

三元运算符 ? :

1
2
int x_abs = x >= 0 ? x : -x;
// 计算绝对值

如果问号?前面的条件满足,则走冒号:前的分支,反之则走冒号:后面的分支。

switch(适合离散值分支)

最基础的写法,使用冒号 : 来标记分支。

  • 使用 case 值: 来定义入口。

  • 必须使用 break;:执行完代码后,必须显式调用 break 语句来跳出 switch 块 。

  • 穿透现象 (Fall-through):如果忘记写 break,程序会继续向下执行下一个 case 的代码,这通常会导致逻辑错误(但也可能被故意利用) 。

1
2
3
4
5
6
7
8
9
switch (monat) {
case 1:
tage = 31;
break; // 必须有 break
case 2:
tage = 28;
break;
// ...
}

而在Java 14中引入了一种新的改进写法(非常好用):

  • 使用 case 值 -> 语句; 的形式。

  • 无需 break:执行完箭头后的语句会自动跳出 switch,不会发生穿透,避免了传统写法中最容易出现的错误 。

  • 支持多值匹配:可以在一个 case 中用逗号分隔多个值,例如 case 1, 3, 5 -> ...

例子:

1
2
3
4
5
6
7
8
9
10
11
12
13
14
15
16
int tageImMonat(int monat) {
int tage = 0;
switch (monat) {
case 1, 3, 5, 7, 8, 10, 12 -> tage = 31;

case 2 -> tage = 28;

case 4, 6, 9, 11 -> tage = 30;

default -> {
System.out.println("Der " + month + ". ist kein gültiger Monat!");
yield "ERROR";
}
}
return tage;
}

switch 不仅可以执行动作,还可以直接返回值(作为表达式赋值给变量) 。

  • 写法 A(使用箭头): 直接返回箭头后的值。

    1
    2
    3
    4
    5
    String season = switch (month) {
    case 12, 1, 2 -> "winter";
    case 3, 4, 5 -> "spring";
    // ...
    };
  • 写法 B(使用冒号 + yield): 如果在表达式中仍使用传统的冒号写法(例如为了执行代码块),则必须使用 yield 关键字来返回值 。

    1
    2
    3
    4
    5
    String season = switch (month) {
    case 12, 1, 2:
    yield "Winter"; // 使用 yield 返回
    // ...
    };

迭代结构

for

1
2
3
for (int i = 0; i < n; i++) {
System.out.println(i);
}

这种写法i会遍历[0,n)的所有数。

如果需要遍历时也需要考虑n的情况,可以写成

1
2
3
for (int i = 0; i <= n; i++) {
System.out.println(i);
}

会比较直观。

注意,循环的每一轮的执行顺序是这样的:

  1. 先判断条件: i < n
  2. 条件为真就执行循环体:System.out.println(i);
  3. 然后再执行更新表达式:i++
  4. 回到 1)
1
2
3
4
int[] arr = {1,2,3};	//定义数组
for (int v : arr) {
System.out.println(v);
}

while

1
2
3
4
5
int i = 3;
while (i > 0) {
System.out.println(i);
i--;
}

先判断条件,若为真则执行循环体,执行完后再次判断;若为假则跳过 。

  • 可以用break来退出当前循环
  • 也可以用continue跳过当前循环的剩余部分并直接开始下一轮循环

do-while

1
2
3
4
int x = 0;
do {
System.out.println("执行一次");
} while (x > 0);

至少执行一次循环体,因为条件检查在末尾 。

数组 Array

基础

定义: 数组将同类型数据连续存储,通过索引(Index)访问,索引从0开始 。

声明/创建/初始化

1
2
3
4
5
6
7
8
// 声明
type [] name;

type name [];

// 创建/初始化
new type [n];
type [] name = {...}

例子

1
2
3
4
5
int [] vector;

int [] vector = {1,2,3,4}

a = new int[6];

引用语义:

  • 数组变量(如 a)存储的不是数组本身,而是一个指向数组的引用(Reference)

  • 别名现象 (Aliasing): 执行 int[] b = a; 后,ba 指向同一个内存地址。修改 b[i] 会导致 a[i] 也发生变化 。

操作

长度: name.length 获取数组元素个数 。

例子:

1
2
int [] vector = {1,2,3,4};
// vector.length = 4

越界: 访问范围之外的索引会触发 ArrayIndexOutOfBoundsException

遍历 (Iteration):

通常写法:

1
2
3
for (int i = 0; i < a.length ; i++){
a[i]...;
}
1
2
3
for(int i: a){

}

也可以用while:

1
2
3
4
5
int i = 1;
while(i < a.length){
a[i]...;
i++;
}

遍历数组的值:

1
2
3
4
int idx = 0;
for (int value : a) {
b[idx++] = value;
}

数组复制:

  • 直接赋值 (b=a) 只是复制引用。
  • 若要深拷贝(真正复制内容),必须创建一个新数组并循环赋值 b[i] = a[i]
  • 也可以使用 java.lang.System.arraycopy(...)
1
2
3
4
5
int [] a = {1,2,3,4};
int b [] = new int[4];
for (int i=0 ; i < a.length ; i++){
b[i] = a[i];
}

例子

查找元素

查找是否存在

1
2
3
4
5
6
7
8
boolean has (long[a], long x){
for (int i=0; i<a.length;i++){
if (a[i]==x){
break;
}
}
return i != a.length;
}

如果存在,查找index:

1
2
3
4
5
6
7
8
boolean has (long[a], long x){
for (int i=0; i<a.length;i++){
if (a[i]==x){
break;
}
}
return i;
}

排序

Bubble Sort:

1
2
3
4
5
6
7
8
9
10
11
12
public static void bubbleSort(int[] fish) {
int zwischen;
for(int round = 0; round < fish.length ; round++){
for (int i=0; i < fish.length-1 - round ; i++){
if (fish[i] > fish[i+1]){
zwischen = fish[i];
fish[i] = fish[i+1];
fish[i+1] = zwischen;
}
}
}
}

多维数组

java仅直接支持一维数组。二维数组实际上是元素维数组的一个数组。

1
new int[][] twoDimArray;
1
2
3
4
A = new int [n][m]

A.length // = n
A[0].length // = m

当然,二维数组不一定每行的长度都是一样的,比如说

1
new int[][] {{1, 3}, {25}, {7, 4, 6, 9}}

也是合法的。

例子(向量加法):

(假设a,b的长度一样且不等于0)

1
2
3
4
5
6
7
public static int[] addVector(int[] a, int[] b){
int [] c = new int[a.length];
for (int i=0; i<a.length;i++){
c[i] = a[i]+b[i];
}
return c;
}

例子(点积):

(假设a,b的长度一样且不等于0)

1
2
3
4
5
6
7
public static int scalarProduct(int [] a, int [] b){
int result = 0;
for (int i=0; i<a.length;i++){
result += a[i]*b[i];
}
return result;
}

例子(矩阵乘法):

1
2
3
4
5
6
7
8
9
10
11
12
13
14
15
16
17
18
19
20
21
22
23
24
25
26
27
28
29
30
31
32
33
34
35
36
public static int[][] matrixMult(int[][] matrixA, int[][] matrixB) {
// 先检查输入是否合规
int aRow = matrixA.length;
int bRow = matrixB.length;

int aCol = matrixA[0].length;
int bCol = matrixB[0].length;

if (aCol != bRow){
return null;
}

for (int idx = 0; idx < aRow ; idx++){
if (aCol != matrixA[idx].length){
return null;
}
}
for (int idx = 0; idx < bRow ; idx++){
if (bCol != matrixB[idx].length){
return null;
}
}

// 真正开始计算
int[][] result = new int[aRow][bCol];

for (int i=0; i < aRow ; i++){
for (int j = 0; j < bCol ; j++){
for (int k=0 ; k < aCol ; k++){
result[i][j] += matrixA[i][k] * matrixB[k][j];
}
}
}

return result;
}

数据结构

链表

构造函数:

1
2
3
4
5
6
7
8
9
10
11
12
13
public class List{
public int info;
public List next;

public List(int x, List l){
info = x;
next = l;
}
public List(int x){
info = x;
next = null;
}
}

插入(将新元素插入到当前元素的后面):

1
2
3
public void insert (int x){
next = new List(x,next);
}

相当于可以拆成2步:

  1. new List(x,next);:新创建一个List元素,并将其next指针的内容设置为当前位置的next指针里的内容,然后
  2. next =:将当前的next指针修改成指向这个新创建的List元素的指针

删除(下一个元素):

1
2
3
4
5
public void delete (){
if (next != null){
next = next.next;
}
}

toString

1
2
3
4
5
6
7
8
9
10
11
12
13
14
15
16
17
pubblic String toString (){
String result = "[" + info;
for List t = next; t != null ; t=t.next){
result = result + ", " + t.info;
}
return result + "]";
}


public static String toString (List l){
if (l == null){
return "[]";
}
else {
return l.toString();
}
}

判断是否为空

1
2
3
4
5
6
7
8
public static boolean isEmpty (List l){
if (l == null){
return true;
}
else{
return false
}
}

计算长度

1
2
3
4
5
6
7
private int length(){
int result = 1;
for (List t=next, t!=null; t=t.next){
result++;
}
return result;
}

(与数组之间的)转换

1
2
3
4
5
6
7
8
9
10
11
12
13
14
15
16
17
18
19
20
21
22
23
public static List arrayToList (int [] a){
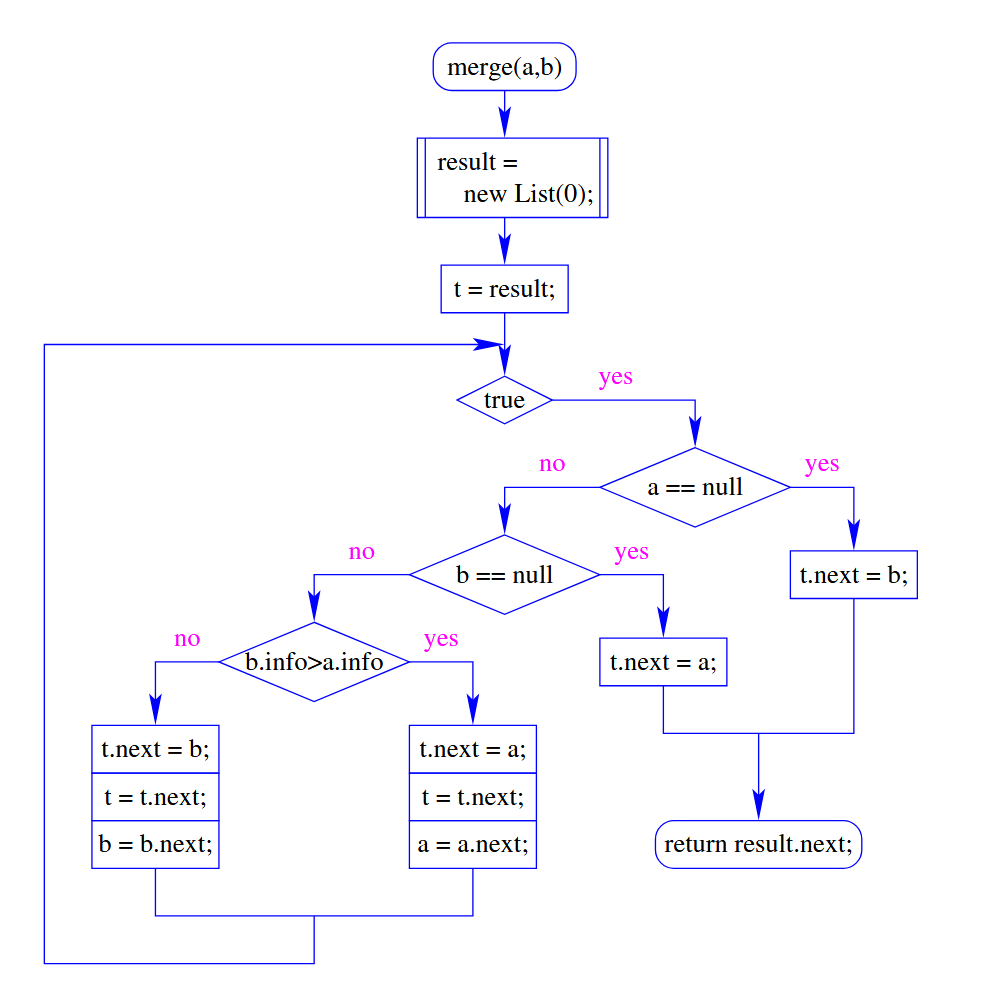
// 从后往前构造链表
List result = null;
if (a != null){
for (int t=a.length-1; i >= 0; i--){
result = new List(a[i], result);
}
}
return result;
}


public int[] ListToArray(){
// 从前往后遍历
List t = this;
int n = length();
int[] a = new int[n];
for (int i=0; i<n; i++){
a[i] = t.info;
t = t.next;
}
return a;
}

Mergesort

1
2
3
4
5
6
7
8
9
10
11
12
13
14
15
16
17
18
19
20
21
22
23
24
25
26
public static List merge (List a, List b) {
List result = new List(0); // 创建一个虚拟的头节点 (Dummy node)
List t = result; // t 指向当前结果链表的末尾

while (true) {
if (a == null) { // 如果列表 a 结束了
t.next = b; // 将列表 b 剩余部分全部接上
break;
}
if (b == null) { // 如果列表 b 结束了
t.next = a; // 将列表 a 剩余部分全部接上
break;
}

// 比较两个列表的当前元素,将较小的那个接在结果链表 t 的后面
if (b.info > a.info) {
t = t.next = a; // t.next 指向 a,然后 t 移动到 a
a = a.next; // a 指针后移
} else {
t = t.next = b; // t.next 指向 b,然后 t 移动到 b
b = b.next; // b 指针后移
}
} // end of while

return result.next; // 丢弃虚拟的头节点并返回结果链表
} // end of merge

image-20251123221613342

栈/Stack (Last In First Out)

1. 实现思路一:使用链表 (List)

1
2
3
4
5
6
7
8
9
10
11
12
13
14
15
16
17
18
19
20
21
22
23
24
25
26
27
28
29
30
31
32
33
34
public class Stack {
// 使用 List 作为底层数据结构
private List l;

// 构造函数:创建空栈
public Stack() {
l = null;
}

// 检测是否为空栈
public boolean isEmpty() {
return l == null;
}

// 弹出栈顶元素(Pop)
public int pop() {
// 假设 l != null
int result = l.info;
l = l.next; // l 指针移向下一个元素,原栈顶元素被移除
return result;
}

// 压入元素(Push)
public void push(int a) {
// 使用 List 的构造函数,头插新元素 a
l = new List(a, l);
}

// 转换为字符串
public String toString() {
return List.toString(l);
}

}

2. 实现思路二:使用动态数组 (int[])

1
2
3
4
5
6
7
8
9
10
11
12
13
14
15
16
17
18
19
20
21
22
23
24
25
26
27
28
29
30
31
32
33
34
35
36
37
38
39
public class Stack {
private int sp; // 栈指针 (Stack Pointer),指向栈顶元素
private int[] a; // 底层数组


// 构造函数:初始化栈指针,创建初始大小为 4 的数组
public Stack() {
sp = -1;
a = new int[4];
}


// 检测是否为空栈
public boolean isEmpty() {
return (sp < 0);
}


public void push(int x) {
sp++; // 栈指针先移动

// 检查数组是否已满
if (sp == a.length) {
int[] b = new int[2 * sp]; // 创建两倍大小的新数组

// 复制元素
for (int i = 0; i < sp; i++){
b[i] = a[i];
}
a = b; // 将引用指向新数组
}
a[sp] = x; // 将新元素存入栈顶位置
}

public int pop() {
// 假设 sp > -1
return a[sp--]; // 返回当前栈顶元素,然后 sp 递减
}
}

pop的优化版本:

1
2
3
4
5
6
7
8
9
10
11
12
13
14
15
16
17
18
19
public int pop() {
// 假设: sp > -1
int result = a[sp]; // 先取出栈顶元素

// 检查是否满足收缩条件:栈指针达到数组长度的四分之一,并且数组至少有2个元素
if (sp == a.length/4 && sp >= 2) { // [cite: 2588]
// 缩容逻辑:创建当前大小一半的新数组 (2*sp)
int[] b = new int[2*sp]; // [cite: 2588]

// 复制元素
for(int i=0; i < sp; i++)
b[i] = a[i]; // [cite: 2589]

a = b; // 将数组引用指向新数组 [cite: 2590]
}

sp--; // 栈指针递减
return result; // 返回结果
}

Queue(First In First Out)

1. 实现思路一:使用链表 (List)

使用两个指针 first(队首)和 last(队尾)来维护队列。

1
2
3
4
5
6
7
8
9
10
11
12
13
14
15
public class Queue {
private List first, last; // [cite: 2645]

// 构造函数:创建空队列
public Queue () {
first = last = null; // [cite: 2646-2648]
}

// 检测是否为空队列
public boolean isEmpty() {
return first == null; // [cite: 2650]
}

// ...
}

操作:

1
2
3
4
5
6
7
8
9
10
11
12
13
14
15
16
17
18
19
20
21
22
23
24
25
26
// 出队元素(Dequeue)
public int dequeue () {
// 假设 first != null
int result = first.info; // 取出队首元素的值 [cite: 2658]

if (last == first) // 检查是否只剩一个元素 [cite: 2658]
last = null; // 如果是,队尾也置为 null [cite: 2658]

first = first.next; // 队首指针后移 [cite: 2658]
return result; // [cite: 2659]
}

// 入队元素(Enqueue)
public void enqueue (int x) {
if (first == null) { // 如果队列为空
first = last = new List(x); // 创建新节点,first 和 last 都指向它 [cite: 2667-2669]
} else {
last.next = new List(x); // 在队尾后面插入新节点 [cite: 2670]
last = last.next; // 更新 last 指针到新节点 [cite: 2671]
}
}

// 转换为字符串
public String toString() {
return List.toString(first); // [cite: 2664]
}

2. 实现思路二:使用动态数组(环形队列)

使用数组和索引指针 first(队首索引)和 last(队尾索引),并通过模运算实现环形队列,并支持动态扩容。

1
2
3
4
5
6
7
8
9
10
11
12
13
14
15
16
public class Queue {
private int first, last; // 队首、队尾索引
private int[] a; // 底层数组

// 构造函数
public Queue () {
first = last = -1; // 初始化为空,索引为 -1 [cite: 2782]
a = new int[4]; // 创建初始大小为 4 的数组 [cite: 2782]
}

// 检测是否为空队列
public boolean isEmpty() {
return first == -1; // [cite: 2783]
}
// ...
}

操作:

1
2
3
4
5
6
7
8
9
10
11
12
13
14
15
16
17
18
19
20
21
22
23
24
25
26
27
28
29
30
31
32
33
34
35
36
// 入队元素(Enqueue)
public void enqueue (int x) {
if (first == -1) // 检查是否为空,如果为空则初始化 first 和 last
first = last = 0; // [cite: 2791]
else {
int n = a.length; // [cite: 2792]
last = (last + 1) % n; // 队尾指针环形前进 [cite: 2792]

if (last == first) { // 判断队列是否已满 (新 last 等于 first) [cite: 2792]
int[] b = new int[2 * n]; // 创建两倍大小的新数组 [cite: 2792]

// 复制元素:按顺序从 a[first] 开始复制到 b[0]
for (int i = 0; i < n; i++)
b[i] = a[(first + i) % n]; // [cite: 2793]

first = 0; // 重置 first 到新数组的头部 [cite: 2793]
last = n; // 重置 last 到新数组的末尾 [cite: 2793]
a = b; // [cite: 2793]
}
}// end else
a[last] = x; // 将新元素存入队尾位置 [cite: 2794]
}


// 出队元素(Dequeue)
public int dequeue () {
// 假设 first != -1
int result = a[first]; // 取出队首元素 [cite: 2797]

if (first == last) // 如果取出后队列为空
first = last = -1; // 重置为 -1 [cite: 2797]
else
first = (first + 1) % a.length; // 队首指针环形前进 [cite: 2797]

return result; // [cite: 2797]
}

另一种完整的List/Stack/Queue的实现

List部分:

1
2
3
4
5
6
7
8
9
10
11
12
13
14
15
16
17
18
19
20
21
22
23
24
25
26
27
28
29
30
31
32
33
34
35
36
37
38
39
40
41
42
43
44
45
46
47
48
49
50
51
52
53
54
55
56
57
58
59
60
61
62
63
64
65
66
67
68
69
70
71
72
73
74
75
76
77
78
79
80
81
82
83
84
85
86
87
88
89
90
91
92
93
94
95
96
97
98
99
100
101
102
103
104
105
106
107
108
109
110
111
112
113
114
115
116
117
118
119
120
121
122
123
124
125
126
127
128
package pgdp.collections;

public class List {
private int size;
private Element head;
private Element tail;

public List(){
size = 0;
head = null;
tail = null;
}

public boolean isEmpty() {
return size == 0;
}

public void clear() {
size = 0;
head = null;
tail = null;
}

public void add(String value) {
if (isEmpty()){
head = tail = new Element(value);
size = 1;
return;
}
Element newTail = new Element(value);
tail.next = newTail;
tail = newTail;
size++;
}

public boolean add(int index, String value) {
if (index <0 || index > size){
return false;
}
if(isEmpty()){
head = tail = new Element(value);
size ++;
return true;
}
if (index == 0){
head = new Element(value,head);
size ++;
return true;
}
if (index == size){
Element newTail = new Element(value);
tail.next = newTail;
tail = newTail;
size++;
return true;
}
Element prev = head;
for (int i = 0; i < index - 1; i++) {
prev = prev.next;
}
prev.next = new Element(value, prev.next);
size++;
return true;
}

public String get(int index) {
if (index <0 || index >= size){
return null;
}
if(isEmpty()){
return null;
}
Element cur = head;
for (int i = 0; i < index; i++) {
cur = cur.next;
}
return cur.value;
}

public void remove(int index) {
if (index <0 || index >= size){
return;
}
if(isEmpty()){
return;
}
if (index == 0){
head = head.next;
size--;
if (size == 0){
tail = null;
}
return;
}
Element prev = head;
for (int i = 1; i < index; i++) {
prev = prev.next;
}
prev.next = prev.next.next;
if (index == size-1){
tail = prev;
}
size--;
return;
}

public int getSize() {
return size;
}


private static class Element {
private String value;
private Element next;

public Element (String value){
this.value = value;
next = null;
}

public Element(String value, Element next){
this.value = value;
this.next = next;
}

}
}

Stack:

1
2
3
4
5
6
7
8
9
10
11
12
13
14
15
16
17
18
19
20
21
22
23
package pgdp.collections;

import java.lang.annotation.ElementType;

public class Stack {
private List list;

public Stack(){
list = new List();
}


public String pop() {
String result = list.get(list.getSize() -1);
list.remove(list.getSize() -1);
return result;
}

public void push(String value) {
list.add(value);
}
}

Queue:

1
2
3
4
5
6
7
8
9
10
11
12
13
14
15
16
17
18
19
20
package pgdp.collections;

public class Queue {
private List list;

public Queue() {
list = new List();
}

public String pop() {
String result = list.get(0);
list.remove(0);
return result;
}

public void push(String value) {
list.add(value);
}
}

LinkedList(链表)

创建与复制

1
2
3
4
5
6
import java.util.*;
// 具体点是import java.util.LinkedList;

LinkedList<Integer> a = new LinkedList<>(); // 空链表
LinkedList<Integer> b = new LinkedList<>(a); // 拷贝一份(浅拷贝)
LinkedList<Integer> c = new LinkedList<>(List.of(1,2,3)); // 从已有集合初始化

判空与长度

1
2
a.isEmpty();   // 是否为空
a.size(); // 元素个数

增加元素(头/尾/指定位置)

1
2
3
4
a.add(10);         // 尾部追加(返回boolean)
a.addLast(10); // 尾部追加(void)
a.addFirst(5); // 头部插入
a.add(1, 99); // 在索引1处插入

访问元素(不删除)

1
2
3
4
5
6
7
a.get(0);          // 按索引访问(O(n)),空则返回 NoSuchElementException
a.getFirst(); // 取头元素(O(1))
a.getLast(); // 取尾元素(O(1))

a.peek(); // 取头元素,空则返回 null
a.peekFirst(); // 同上
a.peekLast(); // 取尾元素,空则返回 null

删除元素(并返回)

1
2
3
4
5
6
7
a.removeFirst();   // 删除并返回头元素(空会抛异常)
a.removeLast(); // 删除并返回尾元素
a.remove(); // 等价 removeFirst()

a.poll(); // 删除并返回头元素(空则返回 null)
a.pollFirst(); // 同上
a.pollLast(); // 删除尾元素(空则返回 null)

删除指定元素/位置

1
2
3
a.remove(0);       // 删除索引0处元素,返回被删元素
a.remove((Integer)10); // 删除“值为10”的那个元素(只删第一个匹配),返回boolean
a.clear(); // 清空

查找/判断包含

1
2
3
a.contains(10);    // 是否包含
a.indexOf(10); // 第一次出现的位置,没有则 -1
a.lastIndexOf(10); // 最后一次出现的位置

遍历

1
2
for (int x : a) { ... }      // 增强 for
a.forEach(x -> { ... }); // forEach + lambda

批量操作

1
2
3
a.addAll(b);       // 把 b 全部追加到 a
a.removeAll(b); // 从 a 里删掉所有出现在 b 的元素
a.retainAll(b); // 只保留 a 和 b 的交集

转换与打印

1
2
System.out.println(a);       // 直接打印:[1, 2, 3]
a.toArray(); // 转数组(Object[])

ArrayList(动态数组)

创建与初始化

1
2
3
4
5
6
7
import java.util.*;
// 具体一点是 import java.util.ArrayList;

ArrayList<Integer> a = new ArrayList<>(); // 空
ArrayList<Integer> b = new ArrayList<>(20); // 预分配容量(可选)
ArrayList<Integer> c = new ArrayList<>(List.of(1,2,3)); // 从已有集合拷贝
List<Integer> d = new ArrayList<>(); // 推荐:用接口类型声明

添加元素

1
2
3
4
a.add(10);            // 末尾追加
a.add(0, 99); // 指定位置插入(后面元素整体后移)
a.addAll(List.of(1,2,3)); // 批量追加
a.addAll(1, List.of(7,8)); // 从索引1处批量插入

读取与改

1
2
int x = a.get(0);     // 按索引读(ArrayList 很快)
a.set(0, 100); // 按索引改,返回旧值

删除

按索引删除

1
a.remove(0);          // 删除索引0,返回被删元素

按值删除(注意 Integer 的坑)

1
a.remove(Integer.valueOf(10)); // 删除“值为10”的第一个匹配,返回 boolean

批量删除/保留

1
2
3
a.clear();            // 清空
a.removeAll(List.of(1,2)); // 删除所有出现在参数集合里的元素
a.retainAll(List.of(3,4)); // 只保留和参数集合的交集

查找与判断

1
2
3
4
5
a.size();
a.isEmpty();
a.contains(10);
a.indexOf(10); // 第一次出现位置,没找到 -1
a.lastIndexOf(10); // 最后一次出现位置

遍历

1
2
3
for (int v : a) { ... }
for (int i = 0; i < a.size(); i++) { ... }
a.forEach(v -> { ... }); // lambda

排序与反转

1
2
3
Collections.sort(a);           // 升序
Collections.reverse(a); // 反转
Collections.shuffle(a); // 打乱

截取子列表

1
List<Integer> sub = a.subList(1, 4); // [1,4) 左闭右开

subList 返回的是原列表的视图,改 sub 会影响 a,反之也一样。想要独立拷贝:

1
List<Integer> subCopy = new ArrayList<>(a.subList(1, 4));

转换

1
2
3
4
Object[] arr = a.toArray();
Integer[] arr2 = a.toArray(new Integer[0]);

List<Integer> copy = new ArrayList<>(a); // 拷贝

面向对象

继承(Vererbung)

现实世界里有很多相似但不完全相同的对象,比如说人类,猩猩,狼等哺乳类动物。

Idea:

  • 共同点提到上面(父类 / 超类)
  • 不同点留在下面(子类 / 派生类)
  • 这样可以 增量开发复用代码(software reuse)

来看个很简单的例子:书和字典。

因为所有书都有页数这个属性,所有我们可以把这个属性直接放进书(父类)的字段里,这样一来各种书都会自动继承这个字段,不需要我们在每种不同的书里都再定义一遍它。

书(父类):

1
2
3
4
5
6
7
8
9
public class Book {
protected int pages;
public Book() {
pages = 150;
}
public void page_message() {
System.out.print("Number of pages:\t" + pages + "\n");
}
}

字典(子类):

1
2
3
4
5
6
7
8
9
10
11
public class Dictionary extends Book {
private int defs;
public Dictionary(int x) {
pages = 2 * pages; // 继承来的属性
defs = x; // 自己的属性
}
public void defs_message() {
System.out.print("Number of defs:\t\t" + defs + "\n");
System.out.print("Defs per page:\t\t" + defs / pages + "\n");
}
}

extends 表示继承:子类Dictionary拥有 Book的所有字段(attribute),再加上自己的字段。

访问控制(private / protected / public)

修饰符 同类内部 同 package 子类 外部世界
private
default(不写) (同 package 的子类才行)
protected
public
1
2
3
public class Book {
int pages; // 这种时候就是default
}

例子:

1
2
3
4
5
6
7
8
9
10
11
12
13
14
15
16
17
public class Food {
private int CALORIES_PER_GRAM = 9;
private int fat, servings;

public Food(int num_fat_grams, int num_servings) {
fat = num_fat_grams;
servings = num_servings;
}

private int calories() {
return fat * CALORIES_PER_GRAM;
}

public int calories_per_serving() {
return (calories() / servings);
}
}
1
2
3
4
5
public class Pizza extends Food {
public Pizza (int amount_fat) {
super(amount_fat, 8);
}
}
1
2
3
4
5
6
7
public class Eating {
public static void main (String[] args) {
Pizza special = new Pizza(275);
System.out.print("Calories per serving: " +
special.calories_per_serving());
}
}

Pizza继承了Food的所有成员,但calories()和属性都是private,所以在Pizza里不能直接访问。但可以通过public的方法calories_per_serving() 间接使用。

关键字 super

很多时候我们需要在子类的构造器里调用父类的构造器,这个时候就需要用到super()

比如说刚才披萨例子里的:

1
2
3
public Pizza (int amount_fat) {
super(amount_fat, 8);
}

调用super()相当于就是在调用父类的构造器,所以接收的参数也一模一样。

superthis类似,只不过指代的是父类。可以用super.来调用父类的所有函数。

比如说刚才字典的例子可以改写成这样:

1
2
3
4
5
6
7
8
9
public class Book {
protected int pages;
public Book(int x) {
pages = x;
}
public void message() {
System.out.print("Number of pages:\t" + pages + "\n");
}
}
1
2
3
4
5
6
7
8
9
10
11
12
public class Dictionary extends Book {
private int defs;
public Dictionary(int p, int d) {
super(p); // 调用父类构造器
defs = d;
}
public void message() {
super.message(); // 先调用 Book.message()
System.out.print("Number of defs:\t\t" + defs + "\n");
System.out.print("Defs per page:\t\t" + defs / pages + "\n");
}
}

属性和方法的覆盖/重写与隐藏

方法重写(override)

当子类里定义了一个同名、同参数列表、同返回类型的方法,就会覆盖(verschatten)父类的实现。

方法调用解析的规则:

  1. 编译时,先在静态类型的类中根据方法名和参数类型,找到最合适的签名(考虑重载)。
  2. 运行时,从动态类型开始往上找这个签名的方法,实现采用最下面的那个实现。

所以方法的选择是参数,静态类型和动态类型共同决定的。

Object

任意类如果没写 extends,默认都是 extends Object

Object 提供了很多通用方法,其中常用的:

  • String toString():把对象转成字符串
  • boolean equals(Object obj):默认比较引用是否相同(this == obj
  • int hashCode():给对象一个哈希值,和集合类有关

例子:

1
2
3
4
5
6
7
8
9
10
11
12
13
public class Poly {
public String toString() { return "Hello"; }
}

public class PolyTest {
public static String addWorld(Object x) {
return x.toString() + " World!";
}
public static void main(String[] args) {
Object x = new Poly();
System.out.print(addWorld(x) + "\n"); // Hello World!
}
}

抽象类(abstract)、final 类和接口(interface)

抽象方法与抽象类

抽象方法:没有实现,只写方法头,用abstract标记。需要在子类里具体实现。

抽象类:只要含有抽象方法,这个类本身也必须标记abstract,不能直接new。不过一个抽象类里也可以有具体的方法。(比如下面例子里的getValue()

例子:

1
2
3
4
5
6
7
8
9
10
11
12
13
14
public abstract class Expression {
private int value;
private boolean evaluated = false;

public int getValue() {
if (evaluated) return value;
else {
value = evaluate();
evaluated = true;
return value;
}
}
protected abstract int evaluate();
}

不同的子类(每个里都需要具体实现evaluate()):

1
2
3
4
5
6
7
8
9
10
11
12
13
14
15
16
17
18
19
20
21
22
23
24
25
26
27
28
29
public final class Const extends Expression {
private int n;
public Const(int x) { n = x; }
protected int evaluate() {
return n;
}
}


public final class Add extends Expression {
private Expression left, right;
public Add(Expression l, Expression r) {
left = l; right = r;
}
protected int evaluate() {
return left.getValue() + right.getValue();
}
}


public final class Neg extends Expression {
private Expression arg;
public Neg(Expression a) {
arg = a;
}
protected int evaluate() {
return -arg.getValue();
}
}
1
2
3
4
Expression e = new Add(
new Neg(new Const(8)),
new Const(16));
System.out.println(e.getValue());

final类和final方法

与abstract通常需要子类来实现其抽象方法后才能真正使用不同,final是不能有子类

  • final class:不能有子类。(例如上面的 Const, Add, Neg

  • final方法:不能被子类重写。

  • final变量:只能赋值一次(常量)。

接口(Interfaces)

之前说到了一个类可以有很多的子类,但是如果我们希望一个子类C同时继承A类和B类的话,那么当A,B里都有一个相同名字的函数meth()时,C类调用super.meth()时到底会调用A类的还是B类的呢?

Java的解决方案非常简单:只允许单继承类,但允许实现多个接口。

接口可以看作是一个特殊的抽象类,只不过其中:

  • 所有方法都是抽象的
  • 所有字段都是常量

接口这个东西有点抽象,所以我们先来看个简单的例子:

1
2
3
public interface Shape {
double area();
}

1
2
3
4
5
6
7
8
9
10
11
12
13
14
15
16
17
18
19
20
21
// 圆形
public class Circle implements Shape {
private double r;
public Circle(double r) {
this.r = r;
}
public double area() {
return Math.PI * r * r;
}
}

// 矩形
public class Rectangle implements Shape {
private double w, h;
public Rectangle(double w, double h) {
this.w = w; this.h = h;
}
public double area() {
return w * h;
}
}
1
2
3
4
5
6
7
8
9
10
11
12
13
14
public class Main {
public static double computeArea(Shape s) {
return s.area(); // 调用的具体实现由运行时决定(Circle 或 Rectangle)
}

public static void main(String[] args) {
Shape c = new Circle(2.0);
Shape r = new Rectangle(3.0, 4.0);

System.out.println(computeArea(c)); // 圆的面积
System.out.println(computeArea(r)); // 矩形的面积
}
}

1
2
3
4
5
6
7
public static double totalArea(Shape[] shapes) {
double sum = 0;
for (Shape s : shapes) {
sum += s.area(); // 不需要单独根据本身的类型处理列表里的每一项
}
return sum;
}

这里的接口主要有几个好处:

  • 提供统一的类型(Shape),从而可以写通用代码:函数参数/返回值/集合元素都用接口类型,不依赖具体类。
  • 处理混合类型集合更简单Shape[] / List<Shape>里放各种形状,直接循环调用 area(),无需 instanceof
  • 编译期强制规范implements Shape的类必须实现 area(),编译器自动检查,减少约定没遵守的错误。

当然接口之间也可以extends

例如接口 Countable

1
2
3
public interface Comparable {
int compareTo(Object x);
}
1
2
3
4
5
public interface Countable extends Comparable, Cloneable {
Countable next();
Countable prev();
int number();
}

Countable组合了两个接口:ComparableCloneable,任何实现Countable的类都必须实现这三个接口中的所有方法(compareTo, next, prev, number 等)。

多态(Polymorphie)

Polymorphie这个单词来自希腊语词根:

  • poly- = 多、许多
  • -morph = 形态、形式
  • -ie(名词后缀)

所以字面意思就是:多种形态/多种形式性。

而在面都对象编程里的定义一般是这样:
多态:同一个“接口/父类型”的变量或方法调用,在运行时可以指向不同的具体对象,从而表现出不同的具体行为。

简单来讲就是:同一句代码(同一个方法调用),因为对象的真实类型不同,执行出不同的结果。

分为编译期和运行期。编译期会检查函数签名,运行期会调用具体的最底层的函数实现。

在继承体系中的多态与方法选择规则

泛型类(Generische Klassen)

可以用java自带的LinkedList<>以及泛型来实现Stack:

1
2
3
4
5
6
7
8
9
10
11
12
13
14
15
package pgdp.collections;

import java.util.LinkedList;

public class Stack<T> {
private final LinkedList<T> stackList = new LinkedList<>();

public void push(T value) {
stackList.addLast(value);
}

public T pop() {
return stackList.pollLast();
}
}

这里<>里的T只是一个占位符,一般用T是因为取的Type的首字母。可以用任意字母。

包装类(Wrapper-Klassen)

递归

Fibonacci

普通递归:

1
2
3
4
5
6
public static long fibonacciRec(int n) {
if (n == 0) return 0L;
if (n == 1) return 1L;
return fibonacciRec(n - 1) + fibonacciRec(n - 2);
}

尾递归:

1
2
3
4
5
6
7
8
9
10
11
12
public class Fibonacci {

public static long fibonacciEndRec(int n) {
return fibTail(n, 0L, 1L);
}

private static long fibTail(int n, long a, long b) {
if (n == 0) return a;
return fibTail(n - 1, b, a + b);
}
}

异常处理

当程序运行出现错误时,会中断正常执行流程 ,然后创建并抛出(throw)一个错误/异常对象。

我们可以捕获并处理这些异常。

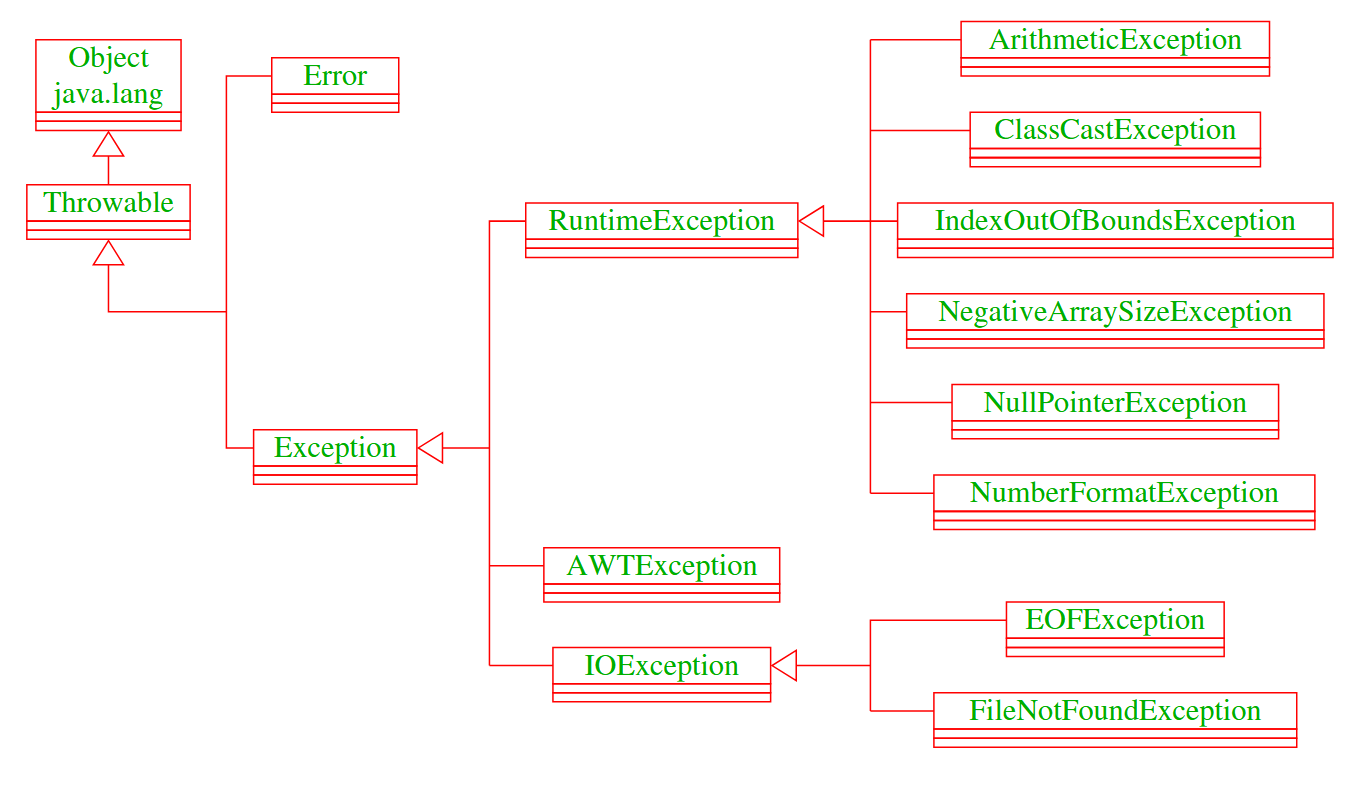
所有的错误都继承自 Throwable 类。主要分为两类 :

  • Error致命错误,通常导致程序终止。
    • 例子StackOverflowError(栈溢出,通常由无限递归引起)、OutOfMemoryError(内存耗尽)。
    • 处理建议:应用程序通常不应该试图捕获这些错误,因为一旦发生,程序基本就无法继续运行了。
  • Exception可处理的异常。
    • a. 运行时异常 (Runtime Exceptions / Unchecked Exceptions)
      • 继承自 RuntimeException
      • 特点:通常由编程逻辑错误引起。编译器不强制要求你捕获它们。
      • 例子
        • NullPointerException:试图访问空对象的属性或方法。
        • IndexOutOfBoundsException:访问数组或列表越界。
        • ArithmeticException:如除以零(例如 1/0)。
    • b. 受检异常 (Checked Exceptions)
      • 继承自 Exception 但不是 RuntimeException 的子类。
      • 特点:通常由外部环境引起(如文件不存在、网络断开)。编译器强制要求你必须处理(捕获或声明抛出),否则代码无法编译通过。
      • 例子IOException(输入输出错误)、FileNotFoundException(文件未找到)。

事先定义好的错误类型:

image-20260119170646531

  • IOException:“输入/输出异常”(Input/Output Exception)

    • FileNotFoundException

      • 读文件时路径不存在
      • 没权限访问
      • 给了一个目录当文件去打开
    • EOFException

      EOF = End Of File(文件结束)。
      通常出现在用 DataInputStream / ObjectInputStream 之类按“二进制格式”读数据时,读到文件末尾还想继续读。

    • InterruptedIOException

      I/O 操作被中断,或超时导致读写中断。常见于网络流、某些阻塞读写。

    • UnsupportedEncodingException:某种字符编码不支持。

  • RuntimeException

如果不处理会怎样?

如果错误发生且未被捕获,程序执行会中止 。

比如说在这个例子里:

1
2
3
4
5
6
7
public class Zero {
public static main(String[] args) {
int x = 10;
int y = 0;
System.out.println(x/y)
}
}

程序崩溃并打印堆栈跟踪(Stack Trace):

1
2
Exception in thread "main" java.lang.ArithmeticException: / by zero
at Zero.main(Compiled Code)

包含三部分信息 :

  1. 发生错误的线程(如 main)。
  2. 错误类的名称及消息(如 java.lang.ArithmeticException: / by zero)。
  3. 发生错误的位置(调用栈信息) 。

处理错误

错误处理的标准结构:

  • try

    • 包含可能出错的代码语句 。
  • catch

    • 紧跟在 try 之后,包含错误处理逻辑。形式为 catch (Exc e) {...},其中 Exc 是错误类型,e 是错误对象 。

    • 多重捕获:可以有多个 catch 块。

    • 注意顺序:必须先捕获具体的子类异常,再捕获通用的父类异常(如先 catch (FileNotFoundException e),后 catch (IOException e))。如果顺序反了,子类的catch块永远无法到达。
  • finally

    • 无论是否发生异常finally 中的代码一定会被执行

      • 如果try块无错误:try执行完后执行finally
      • 如果捕获了错误:catch块执行完后执行finally
      • 如果错误未被捕获:先执行finally,然后继续抛出错误 。
    • 用途:主要用于资源清理,如关闭打开的文件流(stream.close())、释放数据库连接等。哪怕try块中有return语句,finally也会在返回之前执行。

自定义异常

自定义异常的过程主要分为三步:继承构造抛出

1. 选择继承的父类 (核心决策)

这是定义异常时最重要的第一步。你需要决定你的异常是“受检的”还是“非受检的”。

  • 情况 A:继承 java.lang.Exception (受检异常 Checked Exception)
    • 含义:这是一个必须被处理的错误。
    • 场景:通常用于业务逻辑错误外部环境问题(如“余额不足”、“用户不存在”)。你希望强制调用者显式地处理这个情况(try-catch)。
    • 后果:如果不捕获,代码无法编译通过。
  • 情况 B:继承 java.lang.RuntimeException (非受检异常 Unchecked Exception)
    • 含义:这是一个编程错误或不可恢复的错误。
    • 场景:通常用于参数错误代码逻辑漏洞
    • 后果:编译器不强制要求捕获。

2. 提供构造函数

为了让异常携带错误信息,你需要在你的类中重写构造函数,并调用父类(super)的方法。

Java

1
2
3
4
5
6
7
8
9
10
11
12
13
14
15
16
17
18
// 示例:定义一个“库存不足”异常(受检异常)
public class OutOfStockException extends Exception {

// 1. 无参构造
public OutOfStockException() {
super();
}

// 2. 带有错误消息的构造 (最常用)
public OutOfStockException(String message) {
super(message); // 将消息传递给父类,以便通过 e.getMessage() 获取
}

// 3. 带有原因的构造 (用于异常链,见下文注意事项)
public OutOfStockException(String message, Throwable cause) {
super(message, cause);
}
}

3. 抛出与声明 (Throw & Throws)

定义好之后,你就可以在业务代码中使用它了。

  • 抛出 (Throw):在检测到错误逻辑的地方,创建一个异常对象并抛出。

    Java

    1
    2
    3
    if (quantity > stock) {
    throw new OutOfStockException("当前库存不足,剩余: " + stock);
    }
  • 声明 (Throws):如果你定义的异常继承自 Exception(受检异常),你必须在方法签名上告诉调用者可能会抛出这个异常。

    Java

    1
    2
    3
    public void buyProduct(int quantity) throws OutOfStockException {
    // ...
    }

为什么需要异常

核心的原因是为了把“正常逻辑”与“错误处理”分开。

比如说下面这个例子

if 的代码风格

1
2
3
4
5
6
7
if (打开文件成功) {
if (读取第一行成功) {
if (解析数字成功) {
// 做业务...
} else { 处理解析错误 }
} else { 处理读取错误 }
} else { 处理文件错误 }

写起来也很麻烦,阅读起来非常累,很难一眼看清核心业务到底在干嘛。

try-catch 的代码风格

1
2
3
4
5
6
7
8
try {
打开文件();
读取第一行();
解析数字();
// 纯粹的业务逻辑,很连贯
} catch (Exception e) {
// 统一在一个地方处理所有异常的事情
}

这种写法让人一眼就能看懂“正常情况下程序在做什么”。

除此以外,很多错误是检查不出来的 (不可预测性)。有些错误是外部环境导致的,if 检查在时间上存在漏洞(这叫做 TOCTOU 问题:Time Of Check to Time Of Use)。

字符串 (Strings)

在JAVA中,String 是一个非常特殊且极其重要的类。

不可变性 (Immutability)

一个String对象一旦在内存中被创建,它的内容就永远无法改变

例子:

1
2
String s = "Hello";
s = s + " World"; // s 变成了 "Hello World"

看起来 s 变了,但实际上:

  1. 内存中创建了”Hello”。
  2. 内存中创建了” World”。
  3. 内存中创建了一个全新的对象”Hello World”。
  4. 变量 s 的指针从指向”Hello”改为指向”Hello World”。
  5. 原来的”Hello”如果没人用,就会变成垃圾被回收。

为什么这么设计?

  • 安全性:String 常用于数据库连接、文件名、网络地址。如果它是可变的,黑客可以在你检查完权限后、真正使用前修改它的内容。
  • 缓存:因为不可变,所以它的哈希值(HashCode)只需要算一次就可以缓存起来,放入 HashMap 效率极高。
  • 线程安全:多个线程同时读一个字符串,完全不用担心有人会改动它。

字符串常量池 (String Pool)

为了避免内存浪费(比如代码里写了 100 次 “Hello”,没必要在内存里存 100 份),Java 设计了一个特殊的内存区域叫 String Pool

两种创建方式:

  1. 字面量赋值 (Literal)

    1
    2
    String s1 = "Hallo";
    String s2 = "Hallo";

    Java 会先去池子里找有没有 “Hallo”。

    • 如果没有:创建一个放入池子,返回引用。
    • 如果有:直接返回池子里那个对象的引用。

    结果s1 == s2true (它们指向同一个内存地址)。

  2. 使用 new 关键字

    1
    String s3 = new String("Hallo");

    new 关键字强制在堆内存 (Heap) 中创建一个对象,不管池子里有没有。

    结果s1 == s3false (地址不同)。

intern() 方法

它是连接“普通堆内存”和“字符串池”的桥梁。

  • 作用:手动将字符串加入池中。

  • 逻辑: 调用 s3.intern() 时:

    1. 检查池中是否已经包含等于 s3 的字符串。
    2. 如果有:返回池中那个对象的引用。
    3. 如果没有:将 s3 的引用加入池中,并返回它。
  • 代码演示

    1
    2
    3
    4
    5
    6
    String s3 = new String("Hallo"); // s3 在堆上,不在池里
    String s4 = s3.intern(); // s4 指向池里的 "Hallo"
    String s1 = "Hallo"; // s1 也是池里的 "Hallo"

    System.out.println(s3 == s1); // false
    System.out.println(s4 == s1); // true

字符串比较

  • ==:比较的是内存地址(是不是同一个对象)。
    • 利用String Pool和 intern(),我们可以强制让相同内容的字符串共享同一个对象,从而可以使用 == 来加速比较(比逐个字符对比快得多)。
  • equals():比较的是内容(长得一不一样)。

这个String Pool本质上是通过哈希表来实现高效运作的:

  • 计算字符串内容的哈希值
  • 分配到指定的桶里
  • 查找的时候先计算哈希值,然后去桶里找

常用的String方法

trim()

用法:

1
String s2 = s1.trim();

作用:

  • 去掉字符串开头和结尾的所有空白字符(包括空格、制表符 \t、换行 \n 等)。
  • 中间的空格不会被去掉。
  • 返回新字符串,不会直接修改原本的。

例子:

1
2
String s = "   hello world  \n";
String t = s.trim(); // t == "hello world"

isEmpty()

用法:

1
boolean b = s.isEmpty();

作用:

  • 判断字符串长度是否为 0,相当于 s.length() == 0

例子:

1
2
3
"".isEmpty();        // true
" ".isEmpty(); // false,因为里面有一个空格
"abc".isEmpty(); // false

toLowerCase()

用法:

1
String lower = s.toLowerCase();

作用:

  • 返回一个全部小写的新字符串,不改变原来的字符串。

例子:

1
"PiNguin".toLowerCase();   // "pinguin"

replace(target, replacement)

用法:

1
String s2 = s1.replace(".", "");

作用:

  • 所有出现的子串 target 替换成 replacement
  • 不用正则,就是普通的字符串匹配。
  • 返回新字符串,不改原来的。

例子:

1
2
3
4
5
6
7
8
String s = "Pinguin, Pinguin! (?Ping(uin!)";
s = s.toLowerCase();
s = s.replace(".", "");
s = s.replace(",", "");
s = s.replace("!", "");
s = s.replace("(", "");
s = s.replace(")", "");
// "pinguin pinguin ?pinguin"

split(String regex)

用法:

1
String[] parts = s.split("\\s+");

作用:

  • 用参数 regex 作为正则表达式,将字符串按匹配的位置拆分成若干段,返回 String[]
  • 注意:参数是正则表达式而不是普通字符串。

\\s+实际上就是\s+,表示匹配一个或多个空白字符(空格、tab、换行等)。

split(" ")则会按单个空格拆分。

例子:

1
2
3
4
5
6
String s = "  hello   world \n pinguin  ";
String[] parts = s.trim().split("\\s+");

// parts[0] == "hello"
// parts[1] == "world"
// parts[2] == "pinguin"

length()

用法:

1
int len = s.length();

作用:

  • 返回字符串中字符的个数(不是字节数)。

例子:

1
2
3
"".length();        // 0
"abc".length(); // 3
"中文".length(); // 2

compareTo()

用法:

1
int result = s1.compareTo(s2);

作用:

  • 字典序(lexicographical order)比较两个字符串的大小。
  • 返回一个 int(只保证小于等于大于0这三种情况,不保证具体的数值。):
    • < 0s1 在字典序上 小于 s2
    • = 0s1s2 内容相同
    • > 0s1 在字典序上 大于 s2

例子:

1
2
3
4
5
6
7
8
9
10
11
12
"abc".compareTo("abd");   // 结果 < 0,因为 'c' < 'd'
"abc".compareTo("abc"); // 结果 = 0,两个字符串完全一样
"abd".compareTo("abc"); // 结果 > 0,因为 'd' > 'c'

"app".compareTo("apple"); // 结果 < 0,"app" 是前缀,长度更短
"apple".compareTo("app"); // 结果 > 0,"apple" 比 "app" 长

"abc".compareTo("Abc"); // 一般 > 0,小写 'a' 的编码值大于大写 'A'

if (w1.compareTo(w2) > 0) {
// ...
}

迭代器 (Iterators)

如果在编程中没有迭代器,我们处理不同的数据结构会非常麻烦:数组用索引 i 遍历,链表用 node.next 遍历,哈希表(Set/Map)甚至没有顺序,很难遍历。

迭代器模式 (Iterator Pattern) 的核心目的就是:提供一种统一、标准的方式来遍历任何类型的集合,而不需要了解集合底层的具体实现(是数组还是链表)。

在 Java 中,迭代器机制涉及两个长得很像但职责完全不同的接口:

  1. Iterable<T> (可迭代的)

    • 角色:这是集合(容器)要实现的接口。

    • 含义:它向外界声明:“我是存储数据的容器,你可以遍历我。”

    • 核心方法

      • iterator(): 这个方法被调用时,必须返回一个新的、准备好从头开始遍历的 Iterator 对象。
    • 地位:所有的标准集合(List, Set 等)都实现了这个接口。

  2. Iterator<T> (迭代器)

    • 角色:这是负责执行遍历操作的“指针”对象。

    • 含义:它不存储数据,它只是记录“当前读到哪里了”。

    • 核心方法

      1. boolean hasNext():
        • 探测。检查是否还有下一个元素。如果还没遍历完,返回 true
      2. E next():
        • 取值并前移。返回当前的元素,并将内部指针向下移动一步。
        • 注意:如果已经没有元素了还强行调用 next(),会抛出 NoSuchElementException
      3. void remove() (可选):
        • 删除。删除最近一次由 next() 返回的那个元素。
        • 注意:不能连续调用两次 remove(),必须先调用 next() 才能调用 remove()

例子:

1
2
3
4
5
6
7
8
9
class IterableString implements Iterable<Character> {
private String str;
public IterableString(String str) {
this.str = str;
}
public Iterator<Character> iterator() {
return new IterableStringIterator(str);
}
}
1
2
3
4
5
6
7
8
9
10
11
12
13
14
15
class IterableStringIterator implements Iterator<Character> {
private String str;
private int count = 0;
public IterableStringIterator(String str) { this.str = str; }
public boolean hasNext() { return count < str.length(); }
public Character next() {
if (count == str.length()) {
throw new NoSuchElementException();
}
return str.charAt(count++);
}
public void remove() {
throw new UnsupportedOperationException();
}
}

Kollektionen (集合框架)

Collection 是对象的容器(Sammlung von Objekten)。

目标:

  • 统一架构:提供一套标准的方式来存储和操作数据,不需要程序员自己去写链表或动态数组。
  • 抽象化:你只需要针对接口(如 List)编程,而不需要关心底层是用数组实现的(ArrayList)还是链表实现的(LinkedList)。
  • 互操作性:不同的库可以轻松交换数据。
  • 性能:Java 官方提供了高性能的实现。
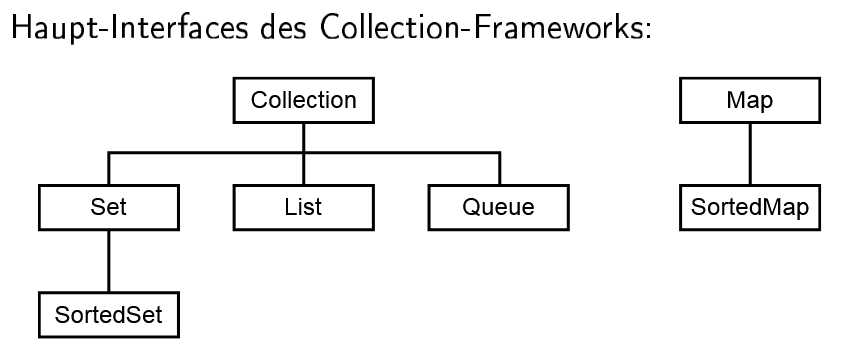
image-20260119211746799

Collection<E> 接口

这是最通用的接口。如果你只知道一个东西是 Collection

  • 你知道的:它能添加(add)、删除(remove)、查大小(size)、清空(clear)、检查包含(contains)、转数组(toArray),并且它是 Iterable 的(可以用 for-each 循环)。
  • 你不知道的:它是否有序?是否允许重复?是否允许 null?(这些取决于具体的子接口或实现类)。

List<E> 接口

  • 特点
    • 有序(Geordnete Collection)。
    • 允许重复(Duplikate erlaubt)。
    • 支持通过 索引 (Index) 访问元素(如 get(int index))。
  • 常用实现类
    • ArrayList:基于动态数组,查询快,增删慢。
    • LinkedList:基于链表,增删快,查询慢。

Map<K, V> 接口

  • 特点
    • 模拟数学中的函数映射。
    • 存储 Key-Value (键值对)
    • Key 不允许重复(每个 Key 最多映射到一个 Value)。
  • 核心方法
    • put(K key, V value): 存入数据。
    • get(Object key): 根据键取值。
    • keySet(): 返回所有键的集合(是一个 Set)。
    • values(): 返回所有值的集合(是一个 Collection)。

Collections 工具类 (Algorithms)

Collections 类包含了一堆静态方法,用来操作集合 :

  • sort(List): 对列表进行排序。
  • reverse(List): 反转列表顺序。
  • disjoint(c1, c2): 检查两个集合是否没有交集(完全不相关)。
  • frequency(c, o): 统计元素 o 在集合 c 中出现的次数。
  • replaceAll(list, old, new): 批量替换。

Lambda 表达式与流(Streams)

Lambda 表达式

在 Lambda 出现之前,如果我们想把一段“逻辑”当作参数传递给方法(比如定义排序规则),我们必须创建一个匿名内部类。这通常意味着要写 5-6 行代码,而其中真正有用的逻辑只有 1 行。

Lambda表达式旨在消除这种“样板代码” (Boilerplate Code)。

语法结构

Lambda 本质上是一个匿名函数(没有名字的方法)。

  • 语法(参数列表) -> { 方法体 }
  • 示例
    • 无参数:() -> System.out.println("Hi")
    • 有参数:(x) -> x * x
    • 多行逻辑:(x, y) -> { int sum = x + y; return sum; }
    • () -> {... ; ...}

注意,写多行逻辑时必须要用{}把要执行的逻辑包起来,否则会报错。

例子:

  • 匿名内部类

    1
    2
    3
    4
    5
    6
    Collections.sort(list, new Comparator<String>() {
    @Override
    public int compare(String s1, String s2) {
    return s1.compareTo(s2);
    }
    });
  • Lambda 表达式

    1
    2
    // 编译器会自动推断 s1 和 s2 的类型
    Collections.sort(list, (s1, s2) -> s1.compareTo(s2));

Lambda 表达式只能用于函数式接口,即只包含一个抽象方法的接口。

方法引用

方法引用(method reference),是 lambda 的一种简写形式。

例子:

我们想对每个元素调用String.valueOf函数:

1
x -> String.valueOf(x)

那么我们可以直接简写成这样:

1
String::valueOf

流 API (Streams)

什么是 Stream?

  • 不是数据结构(不像 List 或 Set 那样存储数据)。
  • 它是对数据源(集合、数组)进行操作的管道 (Pipeline)
  • 核心思想:你可以像工厂流水线一样,对数据进行一系列的加工处理。

使用 Stream 的标准步骤:

  1. 创建流 (Source):从数据源生成流。
    • list.stream()
  2. 中间操作 (Intermediate Operations):对数据进行处理,惰性执行 (Lazy)。
    • 这些操作返回的还是一个 Stream,所以可以链式调用。
  3. 终止操作 (Terminal Operations):触发流的执行,并产生最终结果。
    • 这步之后,流就关闭了,不能再用了。

stream的函数的参数里可以直接写Lambda表达式,非常方便。

常用的 Stream 操作

创建:

  • Stream.of(a, b, c)
    少量固定元素(对象类型)。

    1
    Stream.of(one, two, three)

    Arrays.stream(array)
    从数组创建。对象数组 → Stream<T>;基本类型数组 → IntStream/LongStream/DoubleStream

    1
    2
    Arrays.stream(caughtFish)
    Arrays.stream(intArray) // IntStream

    collection.stream()
    从集合创建(顺序取决于集合类型)。

    1
    caughtFish.stream()

    Stream.generate(supplier)
    无限流,按需调用 supplier.get() 生成元素(通常要配 limit)。

    1
    Stream.generate(supplier).limit(100)

    (常见补充)Stream.iterate(seed, next)
    按规则生成序列(也常是无限)。

    1
    Stream.iterate(0, x -> x + 1).limit(10)

中间操作:

变换 / 映射

  • map(f):每个元素变成另一个元素(x 变成f(x) )

    1
    2
    .map(x -> x * x)
    .map(String::valueOf)
  • flatMap(f):一个元素变成“多个元素的 Stream”(1→多),再铺平

    1
    .flatMap(fish -> Arrays.stream(birthHelper(fish)))
  • mapToInt:将Stream转成IntStream

  • mapToLong:将Stream转成LongStream

  • mapToDouble:将Stream转成DoubleStream

过滤

  • filter(pred):根据条件筛选元素。保留 predicate 为 true 的元素

    1
    2
    .filter(x -> x >= 0)
    .filter(f -> f.weight() >= 0.8)
  • takeWhile(pred):从头开始保留,直到第一次不满足就停止(Java 9+)

    1
    .takeWhile(f -> f.weight() >= 0.8)
  • dropWhile(pred):从头开始丢弃,直到第一次不满足后开始保留(Java 9+)

截取 / 跳过

  • limit(n):最多取前 n 个(对无限流很重要)

    1
    .limit(50)
  • skip(n):跳过前 n 个

    1
    .skip(10)

去重 / 排序

  • distinct():去重(依赖 equals/hashCode

    1
    .distinct()
  • sorted() / sorted(comparator):排序(sorted 稳定排序)

    1
    2
    .sorted()
    .sorted(Comparator.comparingDouble(Fish::weight))

    注意,如果

观察 / 调试(不改变元素)

  • peek(action):对每个元素做“旁路操作”,常用于打印调试;仍然惰性

    1
    .peek(System.out::println)

终止:

遍历输出

  • forEach(action):对每个元素执行操作(并行流顺序不保证)

    1
    .forEach(System.out::println)
  • forEachOrdered(action):保持顺序(尤其用于并行流)

收集成容器

  • toList():收集成 List(Java 16+,返回不可修改 list)

    1
    List<Fish> list = stream.toList();
  • collect(Collectors.toList()):经典写法(通常可修改 list)

  • toArray(...):收集成数组

    1
    Fish[] arr = stream.toArray(Fish[]::new);

聚合 / 归约

  • reduce(...):把多个元素合并成一个结果(例如求和、求积、拼接等)

    • 有初始值(identity)版本:返回一个值

      1
      int sum = Stream.of(3, 1, -4).reduce(0, (a, b) -> a + b);
    • 无初始值版本:返回 Optional(空流时没有结果)

      1
      Optional<Integer> sumOpt = Stream.of(3, 1, -4).reduce((a, b) -> a + b);
    • 常见场景:求最大/最小(也可用 max/min)

      1
      Optional<Integer> maxOpt = Stream.of(3, 1, -4).reduce(Integer::max);
  • count():计数,返回long(元素个数)

  • AnyMatch():用来判断Stream里是否至少有一个元素满足给定条件(Predicate)。

  • sum():计算总和。只有DoubleStream,IntStream,LongStream有这个(数值专用)方法。

一个典型的Stream处理链条通常是这样的:

Java

1
2
3
4
5
6
7
List<String> names = Arrays.asList("Anna", "Bob", "Alice", "Mike");

names.stream() // 1. 创建流
.filter(name -> name.startsWith("A")) // 2. 中间操作:只要A开头的 (Anna, Alice)
.map(name -> name.toUpperCase()) // 2. 中间操作:转大写 (ANNA, ALICE)
.sorted() // 2. 中间操作:排序 (ALICE, ANNA)
.forEach(name -> System.out.println(name)); // 3. 终止操作:打印

输入与输出

image-20260119223644875

核心概念:流 (Stream)

Java 中的 IO 操作基于流 (Stream) 的概念。流是一个有序的数据序列,有一个源头(Source)和一个目的地(Sink)。

  • 输入流 (Input Stream):用于从源头(如文件、键盘、网络)读取数据。
  • 输出流 (Output Stream):用于向目的地(如文件、屏幕、网络)写入数据。

面向字节的输入/输出 (Byteweise Ein- und Ausgabe)

这一部分处理的是原始的二进制数据(8位字节),适用于图像、音频或任何非文本数据。
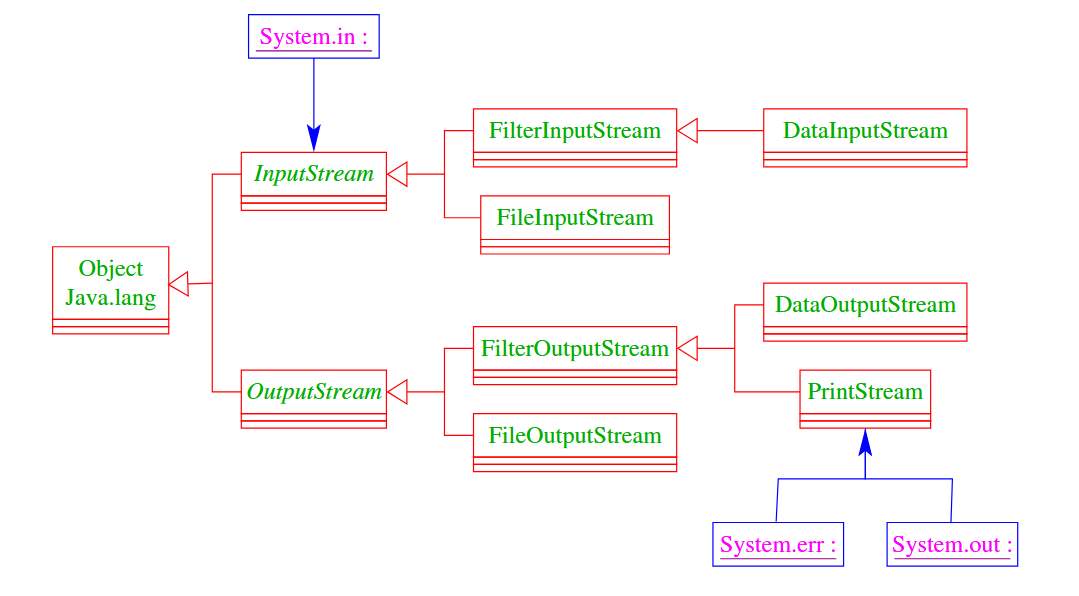
  • 基类 (抽象类)

    • InputStream: 所有字节输入流的父类。核心方法是 read(),每次读取一个字节 。
    • OutputStream: 所有字节输出流的父类。核心方法是 write(int b)
  • 标准输入/输出

    • System.in: 标准输入流 (InputStream),通常指键盘输入 。
    • System.outSystem.err: 标准输出流 (PrintStream),通常指控制台屏幕 。
  • 常用实现类

    • FileInputStream / FileOutputStream: 用于从文件读取或向文件写入字节 。
    • 装饰器模式 (Decorator Pattern):为了增强功能,Java 允许将流“层层包裹”。
      • DataInputStream / DataOutputStream: 允许直接读写 Java 基本数据类型(如 readInt(), writeDouble()),而不仅仅是字节 。
      • 例子new DataInputStream(new FileInputStream("file.txt"))
  • 示例代码逻辑

    • 文件复制:通过循环调用 read() 读取字节直到返回 -1,然后用 write() 写入 。

      1
      2
      3
      4
      5
      6
      7
      8
      9
      10
      11
      12
      import java.io.*;

      public class FileCopy {
      public static void main(String[] args) throws IOException {
      FileInputStream file = new FileInputStream(args[0]);
      int t;
      // 核心逻辑:循环调用 read() 读取字节,直到返回 -1
      while(-1 != (t = file.read()))
      System.out.print((char)t); // 这里演示为输出,也可以改为写入文件
      System.out.print("\n");
      }
      }

面向字符的输入/输出 (Textuelle Ein- und Ausgabe)

这一部分处理的是字符数据(16位 Unicode),专门用于处理文本文件,解决了字符编码问题。

  • 基类 (抽象类)

    • Reader: 所有字符输入流的父类 。
    • Writer: 所有字符输出流的父类 。
  • 桥接流 (转换流)

    • InputStreamReaderOutputStreamWriter: 它们是字节流和字符流之间的桥梁,负责将字节流解码为字符流,或将字符流编码为字节流 。
  • 常用实现类

    • FileReader / FileWriter: 方便地读取和写入文本文件 。
    • BufferedReader: 非常重要。它提供了缓冲功能,提高了读取效率,并且提供了 readLine() 方法,可以一次读取一行文本 。
    • PrintWriter: 提供了方便的打印方法(如 println()),常用于输出文本 。
  • 示例代码逻辑

    • 统计行数:使用 BufferedReader 包装 FileReader,循环调用 readLine() 直到返回 null

      1
      2
      3
      4
      5
      6
      7
      8
      9
      10
      11
      12
      13
      14
      import java.io.*;

      public class CountLines {
      public static void main(String[] args) throws IOException {
      FileReader file = new FileReader(args[0]);
      BufferedReader buff = new BufferedReader(file);
      int n = 0;
      // 核心逻辑:循环调用 readLine() 直到返回 null
      while(null != buff.readLine())
      n++;
      buff.close();
      System.out.print("Number of Lines:\t\t"+ n);
      }
      }

文件处理

例子:

假设我们现在有一个对象Pengui,带3个属性:

1
2
3
4
5
6
7
8
9
10
11
package pgdp.io;

/*
* This is equivalent to a class with the properties name, age & weight
* and a constructor that takes these properties as arguments.
* The class also has getters named name(), age() & weight().
* The class also has a toString() method that prints the properties.
*/
public record Penguin (String name, int age, double weight) {
}

然后我们现在希望利用文件存储/读取这种对象。

写入:

1
2
3
4
5
6
7
8
9
10
11
public void save(Penguin p, String filename) {
try (BufferedWriter w = new BufferedWriter(new FileWriter(filename)) ){
w.write(p.name());
w.newLine();
w.write(String.valueOf(p.age()));
w.newLine();
w.write(String.valueOf(p.weight()));
}catch (IOException e){
throw new RuntimeException(e);
}
}
  • try():括号里的东西算with,就是这里定义的东西可以在try的实际部分调用
  • FileWriter(filename):负责真正地将内容写入进文件
  • new BufferedWriter(...):加一层缓冲,并且提供newLine() 等便捷方法
  • newLine():换行
  • String.valueOf():数转字符串
  • IOException:“输入/输出异常”(Input/Output Exception)

读取:

1
2
3
4
5
6
7
8
9
10
public Penguin load(String filename) {
try (BufferedReader r = new BufferedReader(new FileReader(filename))){
String name = r.readLine();
int age = Integer.parseInt(r.readLine());
double weight = Double.parseDouble(r.readLine());
return new Penguin(name, age, weight);
}catch (IOException e){
throw new RuntimeException(e);
}
}
  • Integer.parseInt():字符串转int
  • Double.parseDouble():字符串转double

并行运行与同步

创建线程

一般有2种方法:

  • 继承Thread:重写 run(),对线程对象调用 start() 后,系统会初始化新线程并并行执行该对象的 run();当前执行流会继续往下走。

    例子:

    1
    2
    3
    4
    5
    6
    7
    8
    9
    10
    11
    12
    13
    14
    public class MyThread extends Thread {
    public void hello(String s) {
    System.out.println(s);
    }
    public void run() {
    hello("I’m running ...");
    } // end o f run ( )

    public static void main(String[] args) {
    MyThread t = new MyThread();
    t.start();
    System.out.println("Thread has been started ...");
    } // end o f main ( )
    } // end of class MyThread
  • 实现Runnable:实现 run(),用 new Thread(runnableObj) 包一层,再 start()。优点是还能继承别的类

    例子:

    1
    2
    3
    4
    5
    6
    7
    8
    9
    10
    11
    12
    13
    14
    public class MyRunnable implements Runnable {
    public void hello(String s) {
    System.out.println(s);
    }
    public void run() {
    hello("I’m running ...");
    } // end o f run ( )

    public static void main(String[] args) {
    Thread t = new Thread(new MyRunnable());
    t.start();
    System.out.println("Thread has been started ...");
    } // end o f main ( )
    } // end of class MyRunnable

调度

但是这样单纯地创建线程并不能保证它们的实际运行顺序。

  • start():进入 ready,等待被调度执行

  • yield():让出 CPU(回到 ready 的直觉)

  • sleep():进入 sleeping,到时间再回 ready

    1
    public static void sleep (int msec) throws InterruptedException
  • join():进入 joining,等待另一个线程结束

每个线程对象都有一个joiningThreads队列:如果t1调用t2.join(),t1会暂停并等待t2结束;t2结束后会唤醒所有等待它的线程。

例子:

1
2
3
4
5
6
7
8
9
10
11
12
13
14
15
16
17
18
19
20
21
22
23
private static int count = 0;
private int n = count++;
private static Thread[] task = new Thread[3];
public void run() {
try {
if (n > 0) {
task[n-1].join();
System.out.println("Thread-"+n+" joined Thread-"+(n-1));
}
} catch (InterruptedException e) {
System.err.println(e.toString());
}
}

//...
public static void main(String[] args){
for (int i=0; i<3; i++){
task[i] = new Thread(new Join());
}
for (int i=0; i<3; i++){
task[i].start();
}
}

先定义了一个全局的(共享的)数组task,用它来记录每个线程,以便每个线程都可以通过这个数组找到其他线程。所以最后会输出:

1
2
Thread-1 joined Thread-0
Thread-2 joined Thread-1

线程3会通过join等待线程2,线程2会等待线程1。

Monitor

synchroized

synchroized来控制需要保护的资源,给它创建kritische Abschnitt。

synchronized只能用在:

  • 方法public synchronized void openShop() { ... }
  • 代码块synchronized(this) { ... }

例子:

1
2
3
4
5
6
7
8
9
10
11
12
13
14
15
16
17
public class Count {
private int count = 0;
public synchronized void inc() {
String s = Thread.currentThread().getName();
int y = count; System.out.println(s+ " read "+y);
count = y+1; System.out.println(s+ " wrote "+(y+1));
}
}
public class IncSynch implements Runnable {
private static Count x = new Count();
public void run() { x.inc(); }
public static void main(String[] args) {
(new Thread(new IncSynch())).start();
}
} // end of class IncSynch

会输出:

1
2
3
4
5
6
Thread-0 read 0
Thread-0 wrote 1
Thread-1 read 1
Thread-1 wrote 2
Thread-2 read 2
Thread-2 wrote 3

ReadWrit-lock

1
2
3
4
5
6
7
8
9
10
11
12
13
14
15
16
17
18
19
20
21
public class RW{
private int countReaders = 0;

public synchronized void startRead() throws InterruptedException{
while(countReaders < 0) wait();
countReaders++;
}
public synchronized void endRead(){
countReaders--;
if (countReaders == 0) notifyAll();
}

public synchronized void startWrite() throws InterruptedException {
while(countReaders != 0) wait();
countReaders = -1;
}
public synchronized void endWrite(){
countReaders = 0;
notifyAll();
}
}

这里synchronized的作用:

  1. 互斥访问:同一时间只能一个线程修改 countReaders(防止竞态)
  2. 提供 wait/notify 的前提wait()notifyAll() 必须在持有同一对象锁时调用(这里锁的是 this

也就是说:这里把 RW 对象本身当作内部管理锁。

当在实例方法前面写 synchronized 时,它锁的是调用该方法的那个对象(this)的监视器锁

1
2
3
class A {
public synchronized void f() { ... }
}

等价于:

1
2
3
4
5
6
7
class A {
public void f() {
synchronized (this) {
...
}
}
}

如果想要分开保护一个对象的不同attribute,可以:

1
2
3
4
5
6
7
8
9
10
11
12
13
14
15
16
17
public class A {
private final Object lock1 = new Object();
private final Object lock2 = new Object();

public void f() {
synchronized(lock1) {
// 保护资源1
}
}

public void g() {
synchronized(lock2) {
// 保护资源2
}
}
}

volatile

而想要监控某个字段的话就需要用volatile,它主要的作用是:

  • 可见性

    • volatile:必须把新值刷新到主内存。

    • volatile:必须从主内存读取最新值。

      所以等待线程就能看见主线程的更新。

  • 有序性

    会先修改volatile字段,然后其他线程才可以读它。

但是volatile不能确保原子性

例子:

1
2
3
4
5
6
7
8
9
10
11
12
13
14
15
16
17
package pgdp.memoryvisibility;

public class BusinessPenguinVolatile {

private volatile boolean isShopOpen = false;

public void waitForShopToOpen() {
while (!isShopOpen) {
}
System.out.println("Shop is open!");
}

public void openShop() {
isShopOpen = true;
}

}

Semaphor

可以直接用JAVA里的Semaphor。

例子:

1
2
3
4
5
6
7
8
9
10
11
12
13
14
15
16
17
18
19
20
21
22
23
24
25
import java.util.concurrent.Semaphore;

public class Demo1 {
static final Semaphore permits = new Semaphore(2);

public static void main(String[] args) {
Runnable job = () -> {
try {
permits.acquire(); // 拿到“名额”才能进
System.out.println(Thread.currentThread().getName() + " entered");
Thread.sleep(300);
} catch (InterruptedException e) {
Thread.currentThread().interrupt();
} finally {
permits.release(); // 归还名额
System.out.println(Thread.currentThread().getName() + " left");
}
};

for (int i = 0; i < 6; i++) {
new Thread(job, "T" + i).start();
}
}
}

  • .acquire():请求进入
  • .release():退出

Consumer-Producer问题

设置3个Semaphore:

  • free:控制满了不能放
  • occupied:控制空了不能取
  • mutex:控制同时只能一个进程改数组和指针
1
2
3
4
5
6
7
8
9
10
11
12
13
14
15
16
17
18
19
20
21
22
23
24
25
26
27
28
29
30
31
32
33
34
35
36
37
38
39
40
41
42
43
44
45
46
47
48
49
50
51
52
53
54
55
56
57
58
59
60
61
62
63
64
65
66
67
68
import java.util.concurrent.Semaphore;

public class Demo3 {
static class BoundedBuffer {
private final int[] data;
private int first = 0, last = 0;

private final Semaphore free;
private final Semaphore occupied;
private final Semaphore mutex = new Semaphore(1);

BoundedBuffer(int cap) {
data = new int[cap];
free = new Semaphore(cap);
occupied = new Semaphore(0);
}

void produce(int x) throws InterruptedException {
free.acquire(); // 没空位就等
mutex.acquire(); // 独占访问数组/指针
data[last] = x;
last = (last + 1) % data.length;
mutex.release();
occupied.release(); // 增加可取元素
}

int consume() throws InterruptedException {
occupied.acquire(); // 没元素就等
mutex.acquire();
int x = data[first];
first = (first + 1) % data.length;
mutex.release();
free.release(); // 增加空位
return x;
}
}

public static void main(String[] args) {
BoundedBuffer buf = new BoundedBuffer(3);

Thread producer = new Thread(() -> {
try {
for (int i = 1; i <= 6; i++) {
buf.produce(i);
System.out.println("put " + i);
Thread.sleep(80);
}
} catch (InterruptedException e) {
Thread.currentThread().interrupt();
}
});

Thread consumer = new Thread(() -> {
try {
for (int i = 1; i <= 6; i++) {
int x = buf.consume();
System.out.println("take " + x);
Thread.sleep(150);
}
} catch (InterruptedException e) {
Thread.currentThread().interrupt();
}
});

producer.start();
consumer.start();
}
}

例子

计算数列和

1
2
3
4
5
6
7
8
9
10
11
12
13
14
15
16
17
18
19
20
21
22
23
24
25
26
package pgdp.threads;

// TODO: Vervollständige diese Klasse, sodass sie einen Thread repräsentiert, der das übergebene Array von lowerBound
// (inklusive) bis upperBound (exklusive) summiert und das Ergebnis in result speichert.
public class ParallelSummer extends Thread{
private final int[] array;
private final int lowerBound;
private final int upperBound;

private long result = 0;

public ParallelSummer(int[] array, int lowerBound, int upperBound) {
this.array = array;
this.lowerBound = lowerBound;
this.upperBound = upperBound;
}
@Override
public void run(){
for (int i = lowerBound; i < upperBound; i++) {
result += array[i];
}
}
public long getResult() {
return result;
}
}
1
2
3
4
5
6
7
8
9
10
11
12
13
14
15
16
17
18
19
20
21
22
23
24
25
26
27
28
29
30
31
32
33
34
35
36
37
38
39
40
41
42
43
44
45
46
47
48
49
50
51
52
53
54
55
56
package pgdp.threads;

import java.util.stream.IntStream;

public class Main {
public static long sumParallel(int[] array, int threadCount) {
if (threadCount <= 0){
throw new IllegalArgumentException();
}
if (array.length == 0) return 0;

ParallelSummer[] threads = new ParallelSummer[threadCount];

int n = array.length;
int chunk = n / threadCount;
int start = 0;

for (int i = 0; i < threadCount; i++) {
int end = (i == threadCount -1)? n : start+chunk;
threads[i] = new ParallelSummer(array, start, end);
start = end;
}
for (ParallelSummer w : threads){
w.start();
}

for (ParallelSummer w : threads){
try{
w.join();
}catch (InterruptedException e){
Thread.currentThread().interrupt();
throw new RuntimeException("Thread interrupted",e);
}
}

long result = 0;
for (ParallelSummer w : threads){
result += w.getResult();
}
return result;
}

public static void main(String[] args) {
int[] toSum = IntStream.range(0, 1_000_000_000).toArray();

long startTime = System.currentTimeMillis();

long result = sumParallel(toSum, 5);

long finishTime = System.currentTimeMillis();

System.out.println("Ergebnis der Berechnung: " + result);
System.out.println("Dauer der Berechnung: " + ( finishTime - startTime ) + "ms");
}
}

或者用实现Runnable的写法:

1
2
3
4
5
6
7
8
9
10
11
12
13
14
15
16
17
18
19
20
21
22
23
24
25
26
package pgdp.threads;

// TODO: Vervollständige diese Klasse, sodass sie einen Thread repräsentiert, der das übergebene Array von lowerBound
// (inklusive) bis upperBound (exklusive) summiert und das Ergebnis in result speichert.
public class ParallelSummer implements Runnable{
private final int[] array;
private final int lowerBound;
private final int upperBound;

private long result = 0;

public ParallelSummer(int[] array, int lowerBound, int upperBound) {
this.array = array;
this.lowerBound = lowerBound;
this.upperBound = upperBound;
}
@Override
public void run(){
for (int i = lowerBound; i < upperBound; i++) {
result += array[i];
}
}
public long getResult() {
return result;
}
}
1
2
3
4
5
6
7
8
9
10
11
12
13
14
15
16
17
18
19
20
21
22
23
24
25
26
27
28
29
30
31
32
33
34
35
36
37
38
39
40
41
42
43
44
45
46
47
48
49
50
51
52
53
54
55
56
57
58
package pgdp.threads;

import java.util.stream.IntStream;

public class Main {
public static long sumParallel(int[] array, int threadCount) {
if (threadCount <= 0){
throw new IllegalArgumentException();
}
if (array.length == 0) return 0;

ParallelSummer[] threads = new ParallelSummer[threadCount];

int n = array.length;
int chunk = n / threadCount;
int start = 0;

for (int i = 0; i < threadCount; i++) {
int end = (i == threadCount -1)? n : start+chunk;
ParallelSummer thread = new ParallelSummer(array, start, end);
Thread t = new Thread(thread);
t.start();

}
for (ParallelSummer w : threads){
w.start();
}

for (ParallelSummer w : threads){
try{
w.join();
}catch (InterruptedException e){
Thread.currentThread().interrupt();
throw new RuntimeException("Thread interrupted",e);
}
}

long result = 0;
for (ParallelSummer w : threads){
result += w.getResult();
}
return result;
}

public static void main(String[] args) {
int[] toSum = IntStream.range(0, 1_000_000_000).toArray();

long startTime = System.currentTimeMillis();

long result = sumParallel(toSum, 5);

long finishTime = System.currentTimeMillis();

System.out.println("Ergebnis der Berechnung: " + result);
System.out.println("Dauer der Berechnung: " + ( finishTime - startTime ) + "ms");
}
}

常用库